
In this comprehensive beginner’s guide to Google Analytics 4 (GA4), I’ll walk you through everything you need to know to harness the power of Google Analytics 4 (GA4) for your website or app.
Whether you’re a small business owner, a marketer, or a web developer, understanding how to leverage this robust analytics platform is essential for making data-driven decisions in today’s digital landscape. So, let’s dive in!
Starting from July 1, 2023, standard Universal Analytics properties will no longer collect data. Don’t worry though, you’ll still be able to view your existing Universal Analytics reports for a period of time after July 1, 2023.
However, going forward, all the new data will flow into your Google Analytics 4 properties. So, it’s important to make sure you have Google Analytics 4 set up to continue tracking and analysing your website’s performance. Learn more about how Google Analytics 4 has replaced Universal Analytics.
In this comprehensive GA4 guide, I’ll cover:
- What is Google Analytics 4?
- The difference between GA4 and UA
- How to set up GA4 for the first time
- How to upgrade to GA4 from an existing UA property
- How to navigate GA4
- How to track events with GA4
- How to track conversions with GA4
- Understanding GA4 Reports
- GA4 Tutorials FAQs
What is Google Analytics 4?
Google Analytics 4 (GA4) is the latest version of the popular analytics platform offered by Google.
It’s designed to help businesses make data-driven decisions and understand user behaviour across websites and apps. With its advanced features and improved tracking capabilities, GA4 provides valuable insights into how users interact with your online presence.
What is the Difference Between Google Analytics 4 and Universal Analytics?
When it comes to website analytics, Google Analytics is a go-to tool for businesses. But what sets Google Analytics 4 (GA4) apart from its predecessor, Universal Analytics (UA)? Let’s dive into the main key differences between Google Analytics 4 vs. Universal Analytics and how they impact your data insights.
Google Analytics 4 (GA4):
• Multi-platform measurement: GA4 allows data collection from websites, iOS apps, and Android apps, providing a unified view of user interactions across various platforms.
• Privacy configuration: GA4 introduces new privacy controls, including cookieless measurement and the exclusion of IP addresses, ensuring more ethical data collection and enhancing user privacy.
• Event-based tracking: GA4 shifts to event-based tracking from session-based data, enabling a comprehensive understanding of user behaviour and conversions throughout the customer journey.
• Predictive metrics: Utilising Google’s machine learning model, GA4 offers predictive analytics, enabling businesses to project future user behaviour, such as purchase or churn probabilities and predicted revenue.
Universal Analytics (UA):
• UA primarily focuses on data collection from websites and lacks multi-platform measurement capabilities for iOS and Android apps.
• UA provides less advanced privacy configuration options compared to GA4, and IP addresses are retained in the data.
• UA relies on a session-based model, which can limit insights into granular user behaviour compared to GA4’s event-based approach.
• UA does not offer built-in predictive metrics or the same level of machine learning capabilities as GA4.
In summary, Google Analytics 4 introduces several significant advancements, such as multi-platform measurement, enhanced privacy controls, event-based tracking, and predictive analytics, setting it apart from the more limited features of Universal Analytics.
How To Set Up Google Analytics 4 For The First Time
Setting up Google Analytics 4 (GA4) for the first time is relatively straightforward. Follow these step-by-step instructions to get started:
Step 1: Sign in to your Google Account Visit the Google Analytics website (analytics.google.com) and sign in using your Google Account credentials. If you don’t have a Google Account, you can create one for free.

Step 2: Create a New Google Analytics 4 Property After signing in, click on the “Start for free” button or the “Set up for free” link on the Google Analytics homepage. This will begin the process of creating a new property.
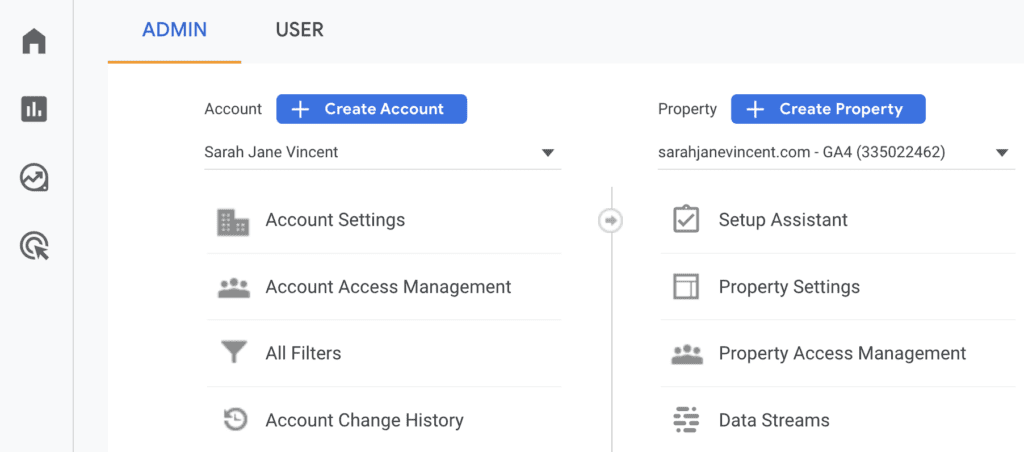
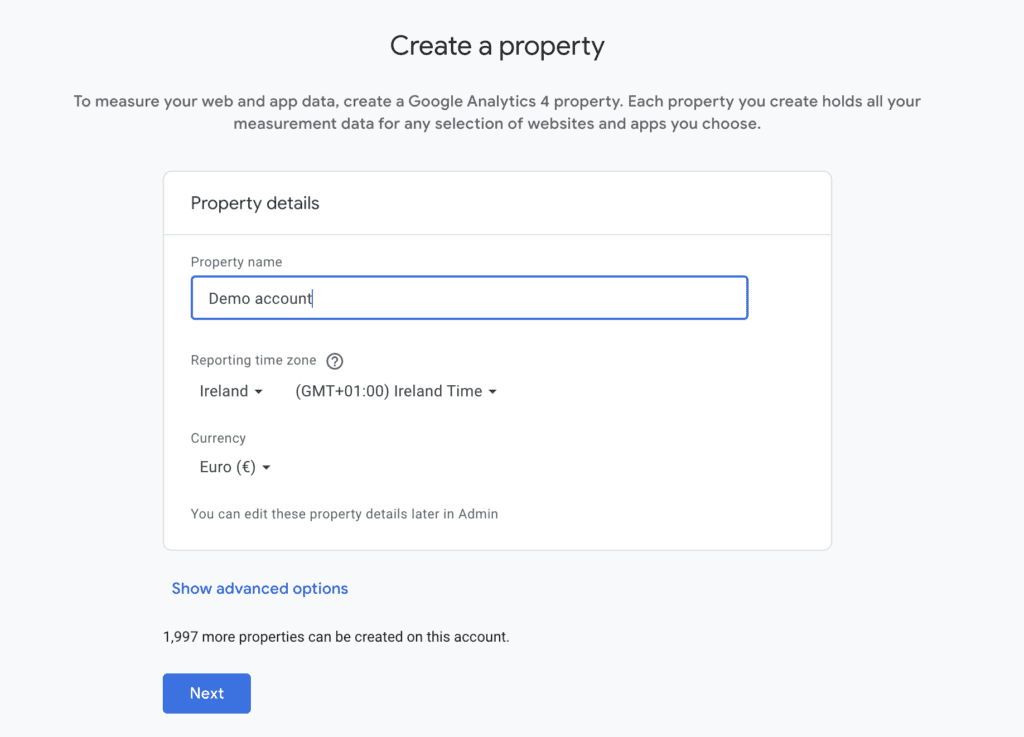
Step 3: Choose Your Property Details In the property creation form, enter the name of your website or app. Next, select your reporting time zone and currency preferences. These settings will determine how your data is displayed in reports.
Step 4: Select the Data Stream Type Choose the appropriate data stream type based on what you want to track: “Web” for websites or “Apps” for mobile apps.

Step 5: Provide Your Website or App Details Fill in the relevant details for your website or app, such as the website URL or the app’s store URL. For apps, select the appropriate platform (Android or iOS) and provide the package name (Android) or bundle ID (iOS).
Step 6: Enable Enhanced Measurement (Optional) GA4 offers enhanced measurement, which automatically tracks certain events like page views, scrolls, and outbound clicks. You can toggle the switch to enable or disable this feature based on your preferences.

Step 7: Advanced Options (Optional) Expand the advanced options if you want to configure additional settings, such as data-sharing options or custom dimensions.
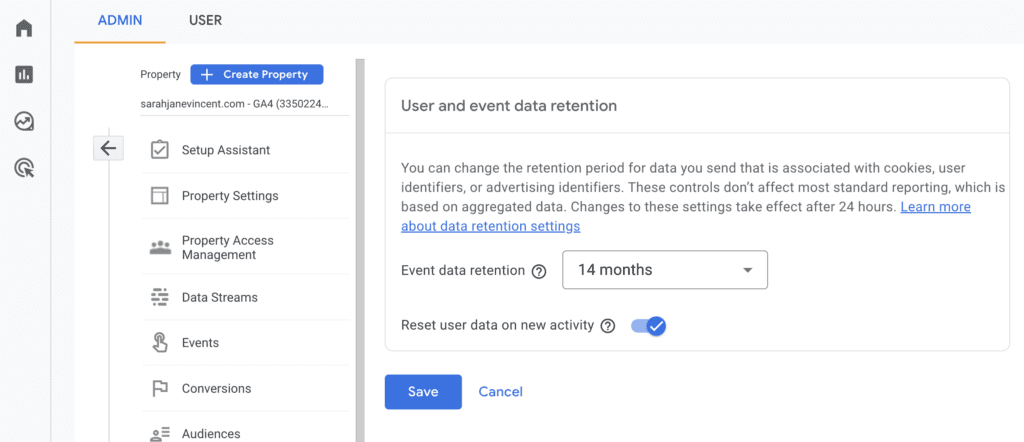
Pro Tip: By default the user event and data retention is set to 2 months. In the main admin area scroll down to the “Data Retention” tab. Click on the drop-down arrow and change it to 14 months. Then click “save”.
Step 8: Create the Property Once you’ve provided all the necessary information, click on the “Create” button. Google Analytics will then generate a unique Measurement ID for your new property.
Step 9: Integrate the Tracking Code To start collecting data, you need to add the tracking code to your website or app. You will find the tracking code snippet or Measurement ID under the “Measurement ID” section in the property settings.

Pro Tip: There are a number of ways you can add the tracking code snippet or Measurement ID, however, the easiest option in my professional opinion is to use Google’s official WordPress plugin Site Kit.
Note: The following steps below will show you how to add your Google Analytics 4 tracking ID and link your Google Tag Manager account on WordPress without modifying your website code.
Option 1: Install Google Site Kit plugin On WordPress
Step 1: In your WordPress dashboard, go to “Plugins”, and click on “Add New”.
Step 2: Next, in the search bar type in “Site Kit by Google”. Click on the “Install Now” button. Then click on “Activate”.
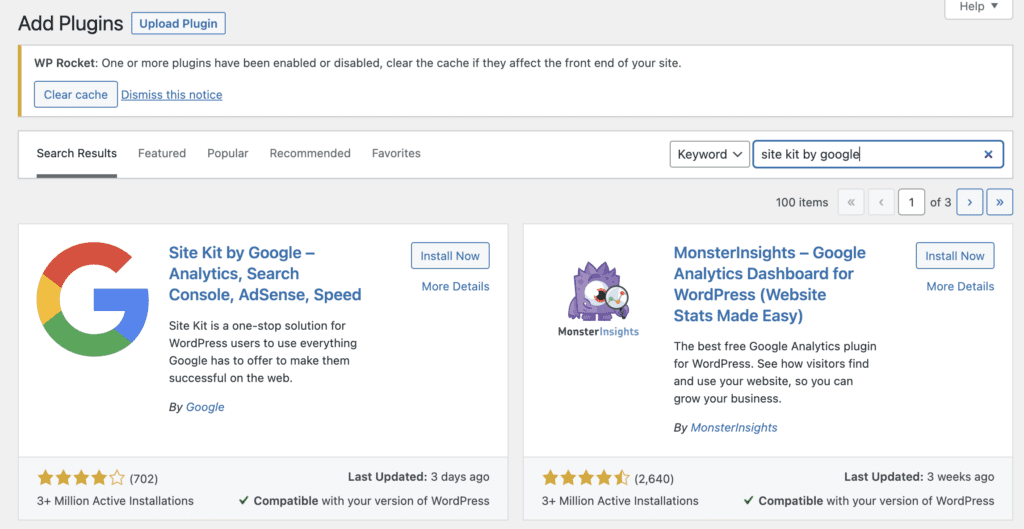
Step 3: Once the plugin is activated, you’ll see a new “Site Kit” tab on the left-hand menu in your WordPress dashboard. Click on it to start the setup process.
Step 4: Click on the “Start Setup” button. You’ll be prompted to sign in to your Google account or select an existing account.
Step 5: After signing in, Google will ask for permission to access your Google account data and manage your Google Analytics and other services. Click on “Allow” to proceed.
Step 6: Next, you’ll see a list of websites associated with your Google account. Select the website you want to connect to the “Site Kit by Google” plugin.
Step 7: Follow the on-screen instructions to complete the setup process. The plugin will automatically connect to your Google Analytics, Search Console, AdSense, and PageSpeed Insights data.
Step 8: Once the setup is complete, you’ll see a success message. You can now access your website’s Google data from the “Site Kit” tab in your WordPress dashboard.
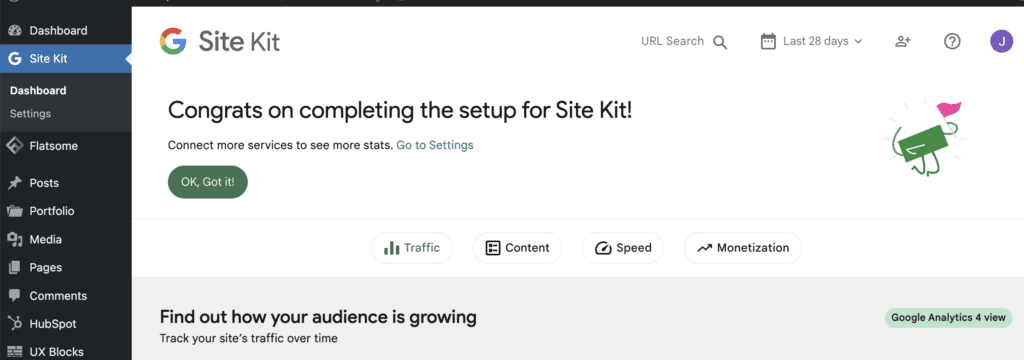
Congratulations! You have successfully installed and set up the “Site Kit by Google” plugin on your WordPress website. Now, you can easily access and monitor your Google data directly from your WordPress dashboard for better insights into your website’s performance and audience engagement.
Option 2: Set Up Google Analytics 4 (GA4) Using Google Tag Manager and Site Kit
Setting up Google Analytics 4 (GA4) with Google Tag Manager is a great way to streamline your analytics implementation process.
Note: In my professional opinion it is best practice to use Google Tag Manager to house all your tracking code snippets. Also, at the time of writing this post, Google seem to be building out GA4 with prompts to set up a Google Tag Manager account in order to make the implementation process simpler and streamlined.
Here’s a step-by-step guide on how to do it:
Step 1: Sign in to Google Tag Manager If you don’t already have a Google Tag Manager (GTM) account, sign in or create one at tagmanager.google.com. Make sure you use the same Google Account associated with your Google Analytics property.
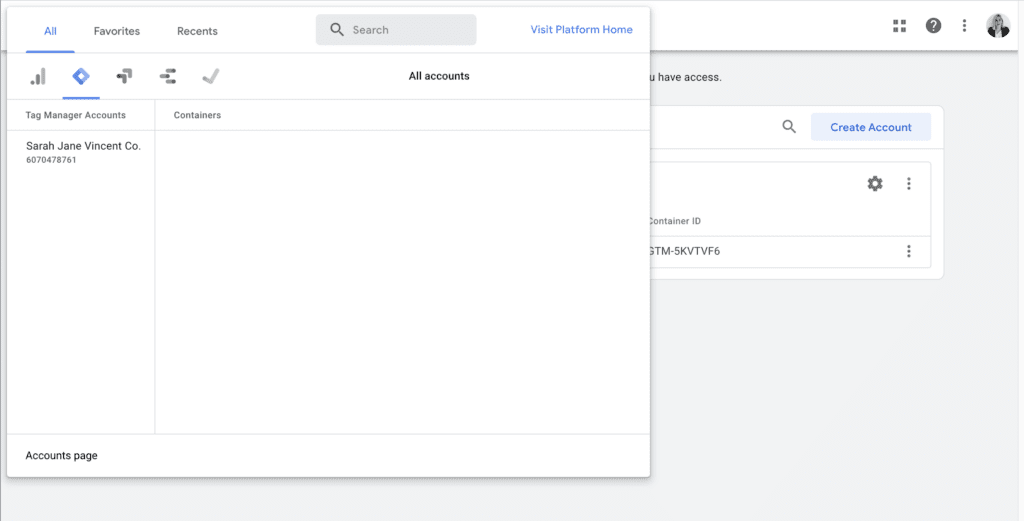
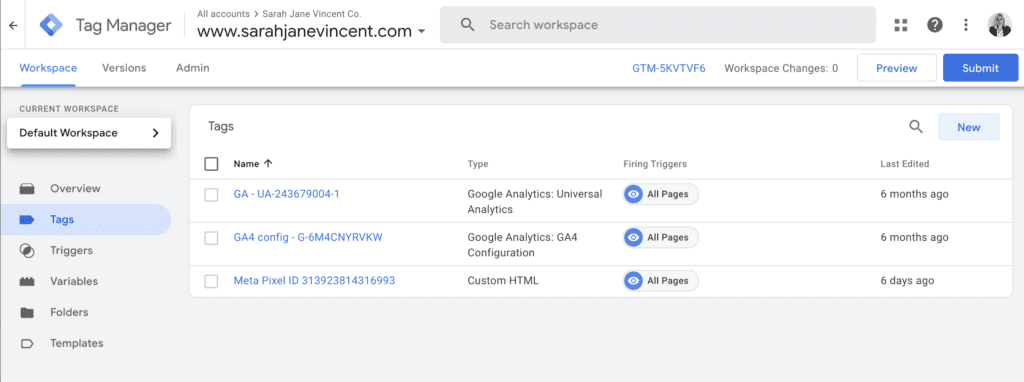
Step 2: In Google Tag Manager, navigate to your desired container (or create a new one). Click on “Tags” in the left-hand menu. Click on the “New” button to create a new tag. Name your tag (e.g., GA4 Configuration Tag).
Pro Tip: I use a foolproof naming tag convention that includes the “Tag Title” and the “Tracking ID” which makes it really handy to know what exact tag you’re working with.
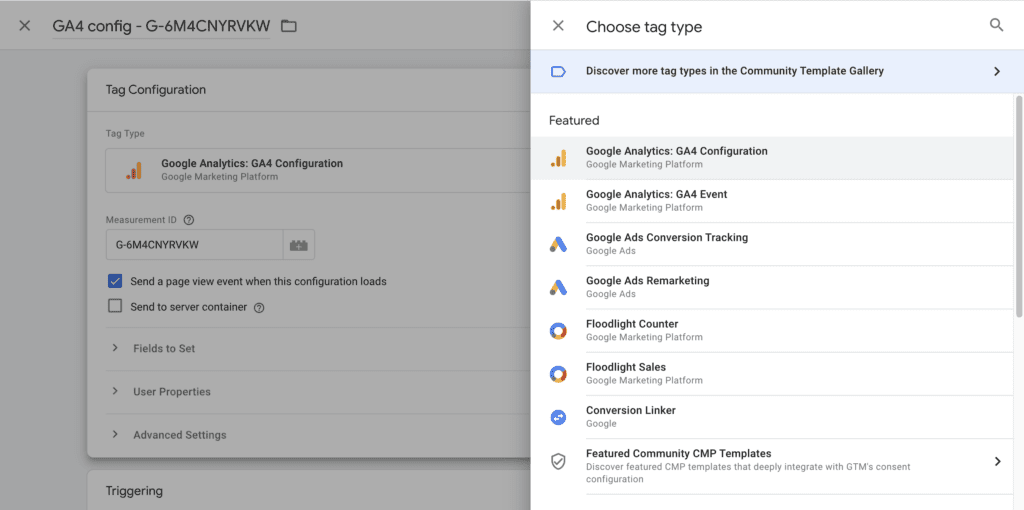
Step 3: Click on the “Tag Configuration” section and select “Google Analytics: GA4 Configuration. Enter your GA4 Measurement ID. You can find this ID in your Google Analytics 4 property settings (it starts with “G-“). Choose the appropriate “Fields to Set” if you want to customise any GA4 settings
Step 4: Click on the “Triggering” section to specify when the GA4 Configuration Tag should be triggered. You can use an “All Pages” trigger to fire the tag on every page of your website.
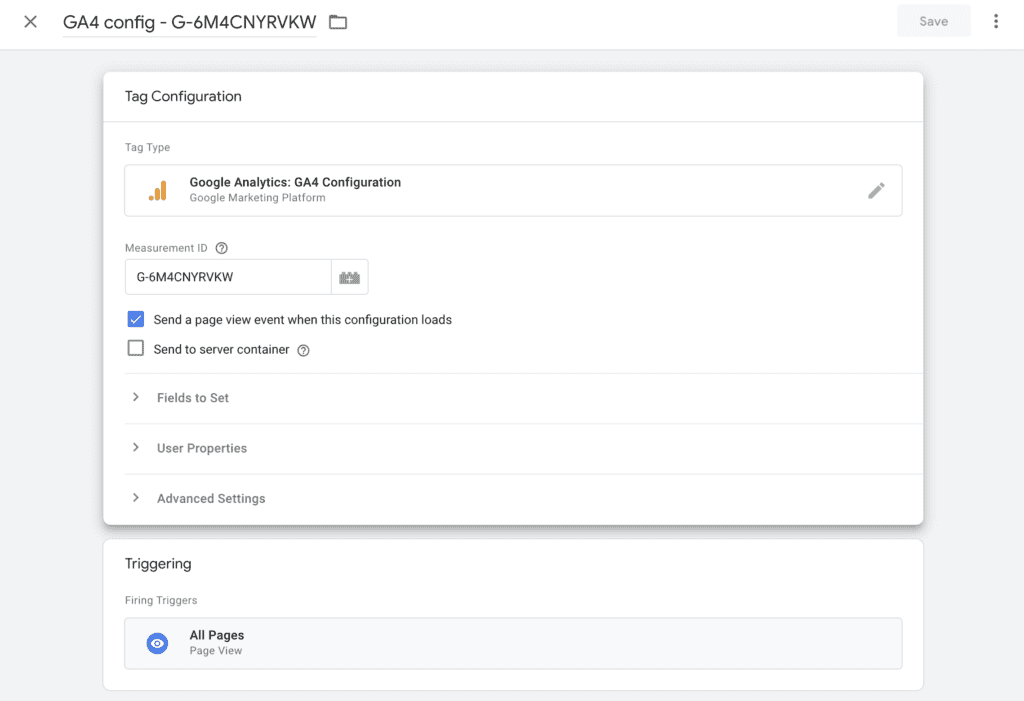
Step 5: Click on the “Save” button to save the tag configuration. Click on the “Submit” button in the upper right corner of Google Tag Manager to publish the changes to your container.
Step 6: Once you’ve published the changes, you’ll be provided with a new GTM container snippet. Copy the “Container ID” in the top right-hand corner of your Google Tag Manager workspace.
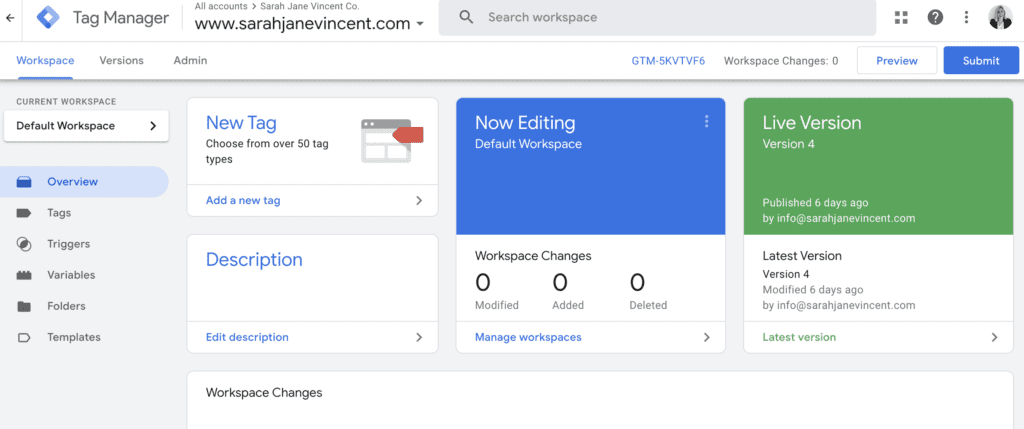
Step 7: In your WordPress dashboard, navigate to “Site Kit” > “Settings”. Then click on the “Connect More Services” section and click on”Set up Tag Manager”. Follow the prompts to connect Site Kit to your Google Tag Manager account.
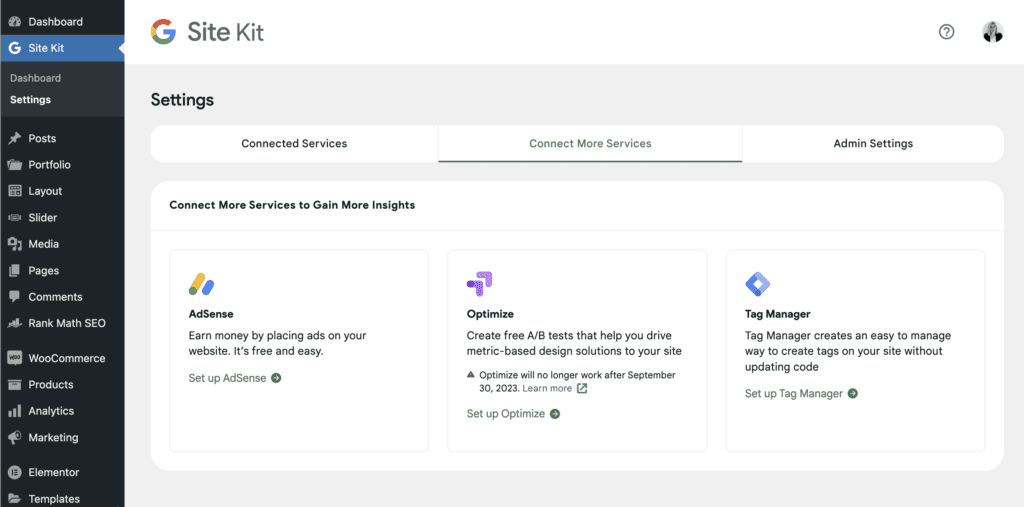
Congratulations! You have now successfully linked your Google Tag Manager to Site Kit.

Step 8: After setting up your Google Tag Manager account and linking it to Site Kit you need to check if everything is working properly and the tags are firing correctly on each page. To do this, you can install the “Google Tag Assistant” Chrome extension.
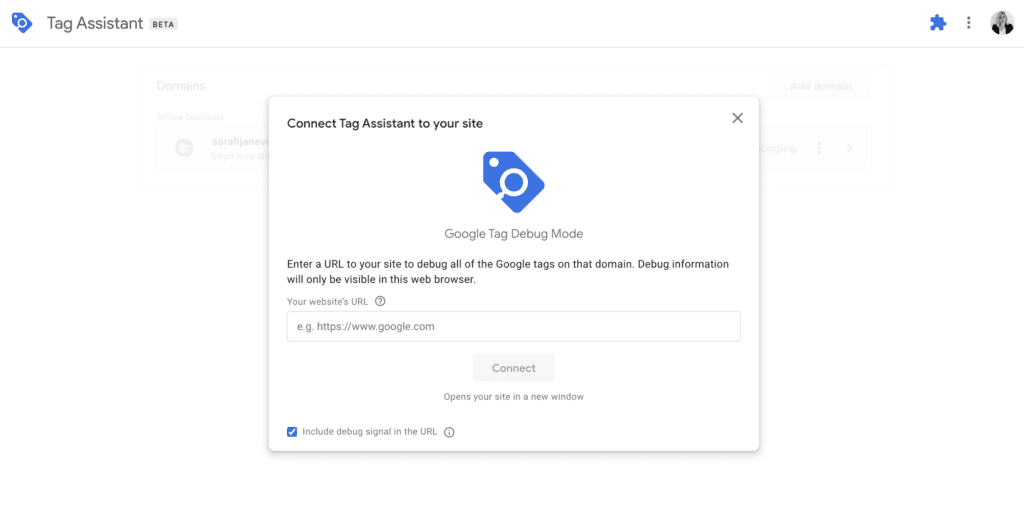
Step 9: Enter your website URL and click “Connect”. Once the Tag Assistant has successfully connected to your website you will see a pop-up window showing that it has connected. Click on “Continue”.
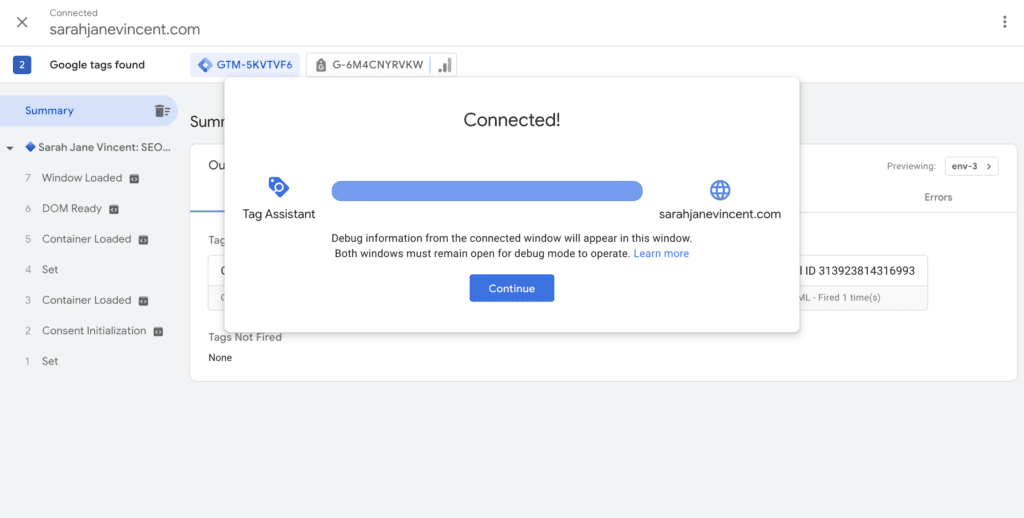
Step 10: You will be able to see a summary of the tags fired. Check to make sure you can see the GA4 config tag and that it has fired.
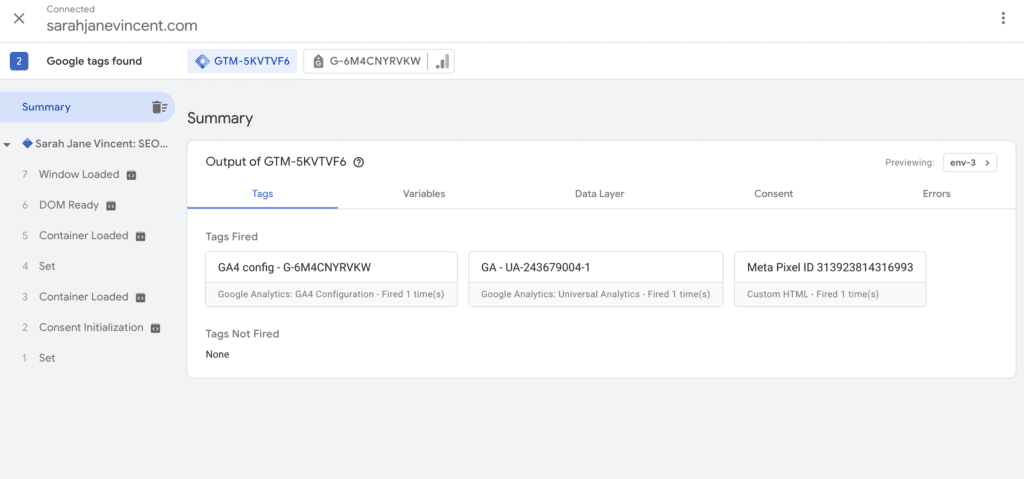
Now that Google Tag Manager is connected to your website, you can start setting up tags, triggers, and variables within GTM to track various events and actions on your site.
How To Upgrade to GA4 Property From an Existing Universal Analytics Property
The GA4 Setup Assistant simplifies the migration process from a Universal Analytics property to Google Analytics 4. By creating a new Google Analytics 4 property in your Analytics account, it seamlessly collects data alongside your existing Universal Analytics property.
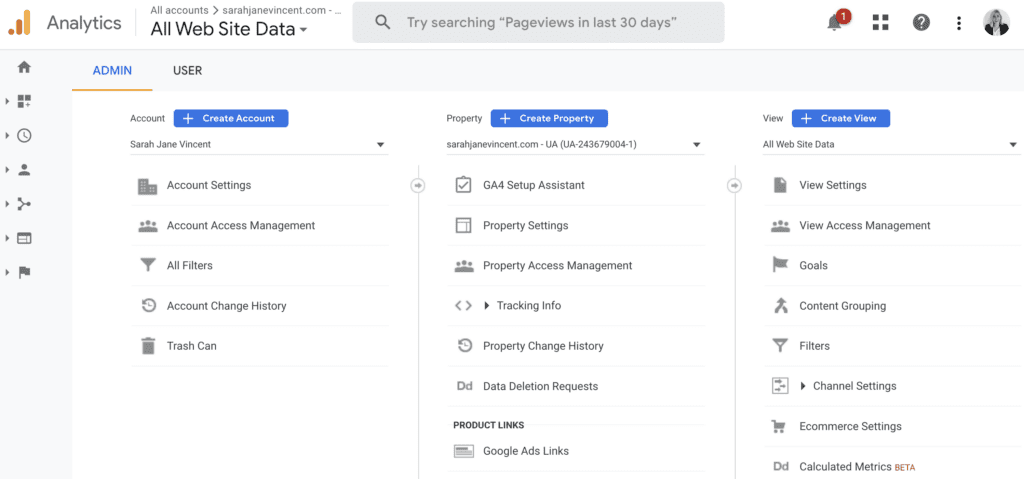
Step 1: In your Google Analytics account, click on “Settings” at the bottom lower left of the dashboard. Then click on “GA4 Setup Assistant” under Property.
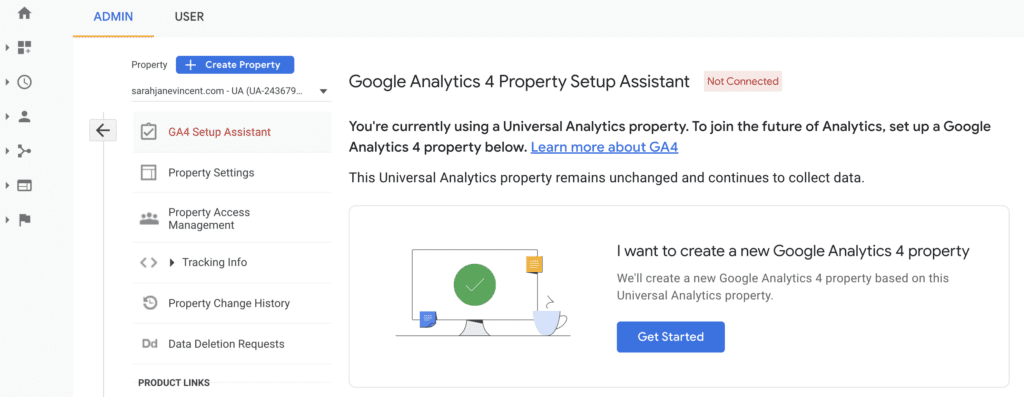
Step 2: Click “Get Started” under I want to create a new Google Analytics 4 property.
Step 3: Click on “Create and continue”.
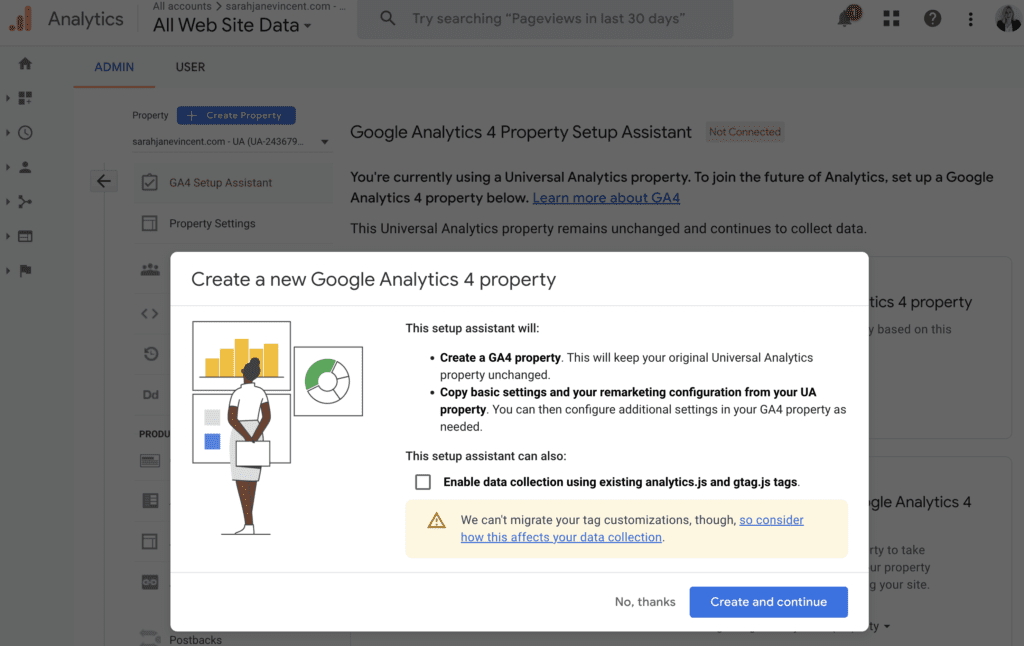
Step 4: When your new Google Analytics 4 account has been successfully created you’ll see “You have successfully connected your properties” at the top of your Google Analytics 4 Property Setup Assistant page.
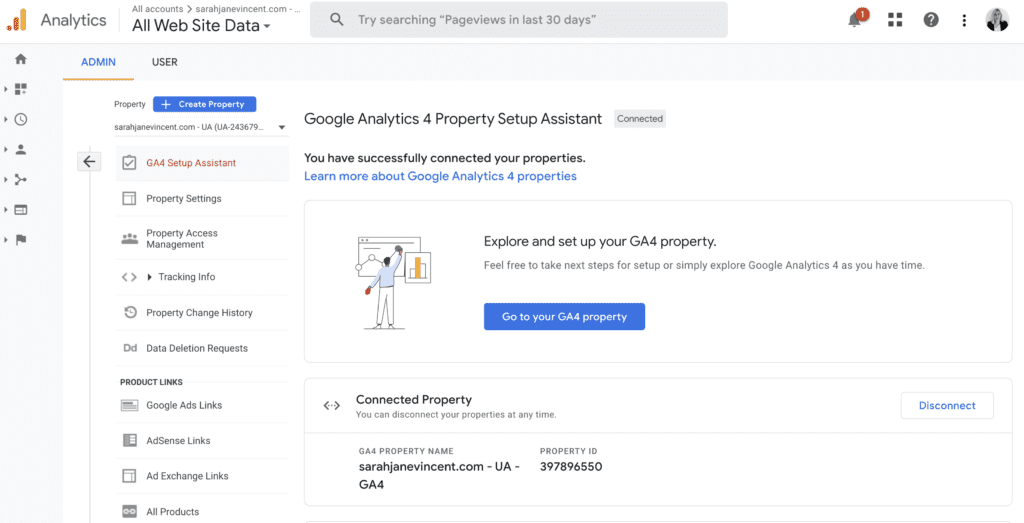
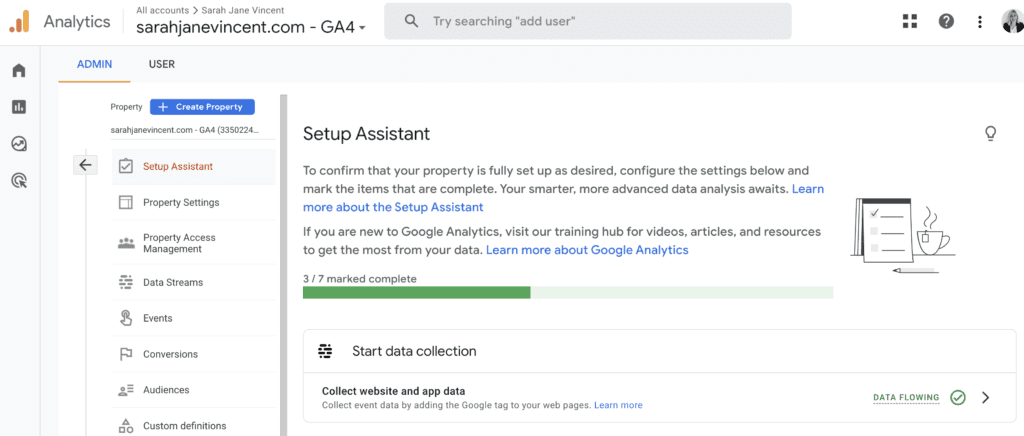
Step 5: Click “Go to your GA4 property” and then click on “Setup Assistant“. You will then be guided through the recommended features and settings to help you finish setting up your GA4 property.
Note: It can take up to 30 minutes for data to begin appearing in your new GA4 property.
Step 6: Copy your measurement ID under the “Measurement ID” section in property settings. Add the code to your website and verify that it is working properly using the previous steps shown.
How to Navigate Google Analytics 4 (GA4)
Navigating Google Analytics 4 (GA4) is straightforward and user-friendly. Here’s a step-by-step guide to help you navigate through the different sections:
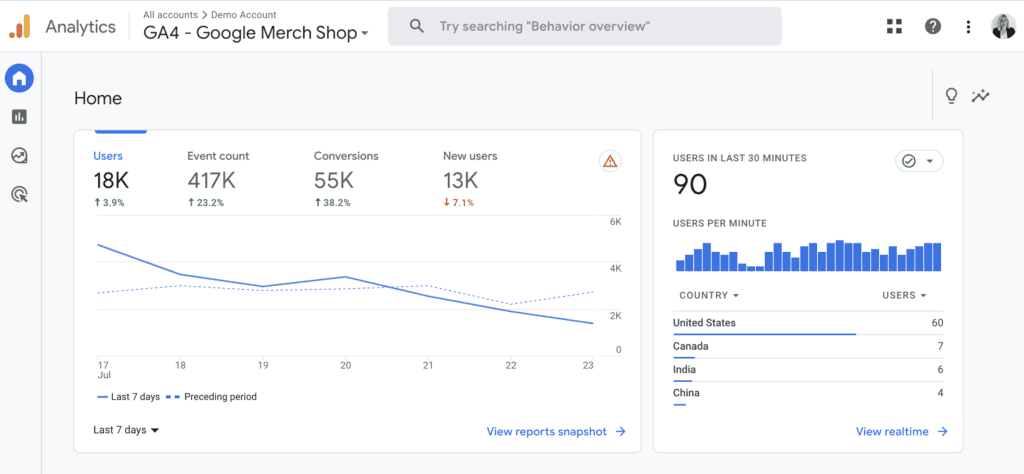
1. Home
The “Home” section in Google Analytics 4 (GA4) serves as your go-to dashboard, providing a quick overview of your website or app’s performance. Easily track active users, monitor conversion rates, and spot popular user actions with easy-to-read charts. It’s your starting point to stay on top of your online success and make smart decisions for your business.
Pro Tip: Utilise GA4’s powerful search feature located at the top of your dashboard to quickly find specific reports, events, dimensions, or metrics within the interface, streamlining your data analysis and decision-making process.
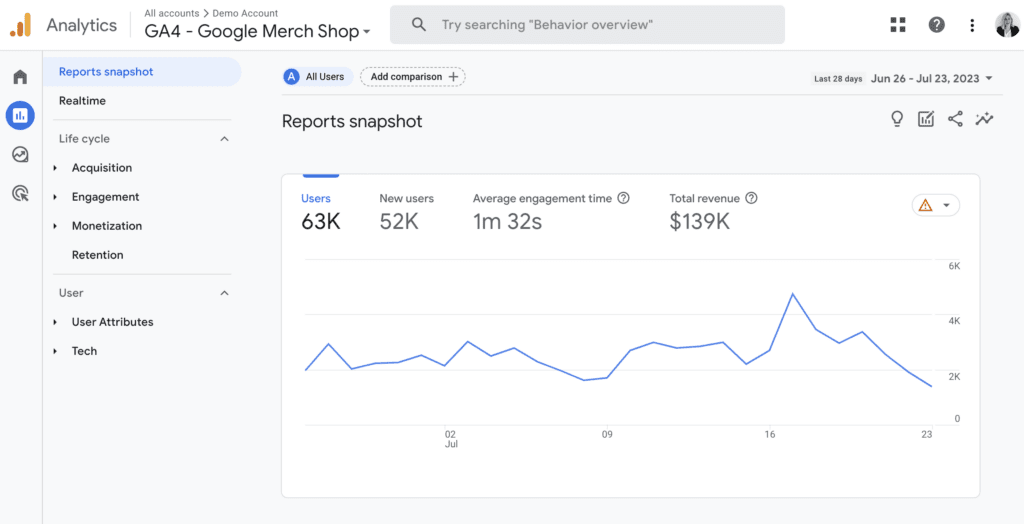
2. Reports
The “Reports” section in Google Analytics 4 (GA4) is where you’ll find detailed data about your audience, like where they come from, what they do on your website or app, and how they convert. You can easily identify your best-performing areas and spots that need improvement, helping you fine-tune your marketing strategies and content to reach your goals effectively. With these comprehensive reports, you’ll gain valuable insights into your website or app’s performance and make informed decisions to drive your success.
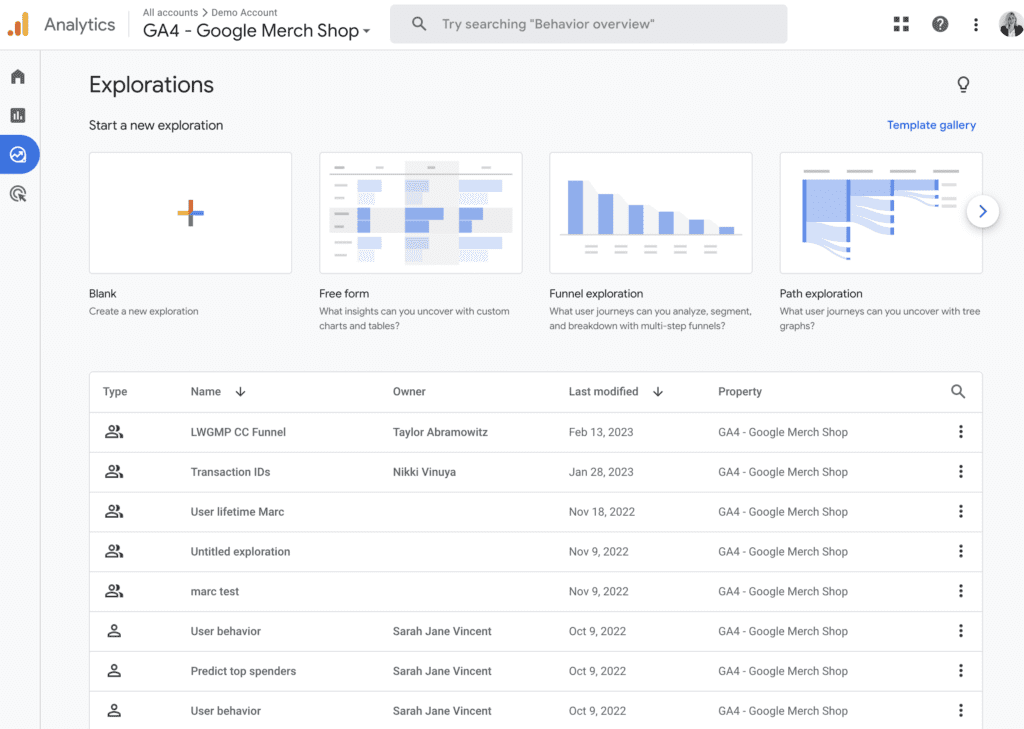
3. Explore
The “Explore” section in Google Analytics 4 (GA4) is a powerful resource that goes beyond standard reports. With Explore, you can perform quick ad hoc queries, easily switch between techniques, and explore data in more detail. You can also use filters and segments to focus on specific information and create custom segments and audiences. Sharing your explorations with others and exporting exploration data for use in other tools are also possible. Overall, Explore allows you to uncover valuable insights, make informed decisions, and optimise your strategies for success.
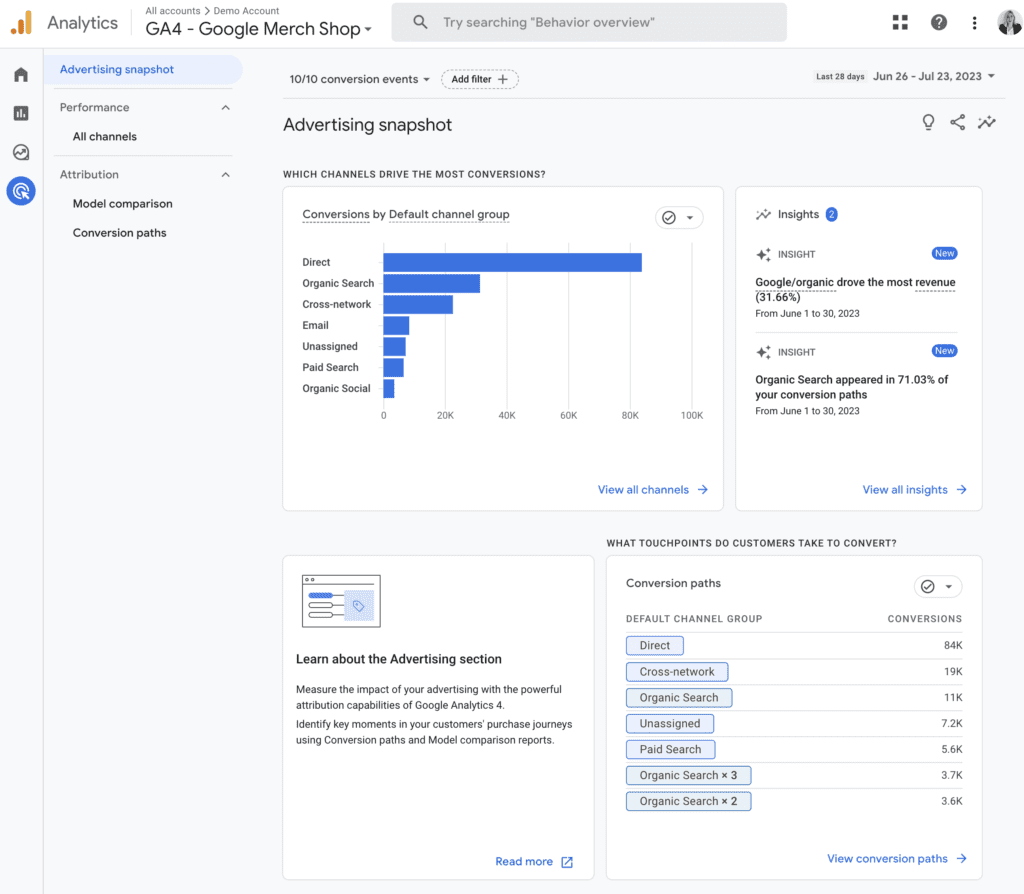
4. Advertising
The “Advertising” section in Google Analytics 4 (GA4) is your gateway to understanding the impact of your ad campaigns on your website or app performance. Easily connect with Google Ads to get a full view of your ad spend, click-through rates, and return on investment. With this information, you can make smart choices, optimize your ad strategies, and get the most value from your advertising efforts.
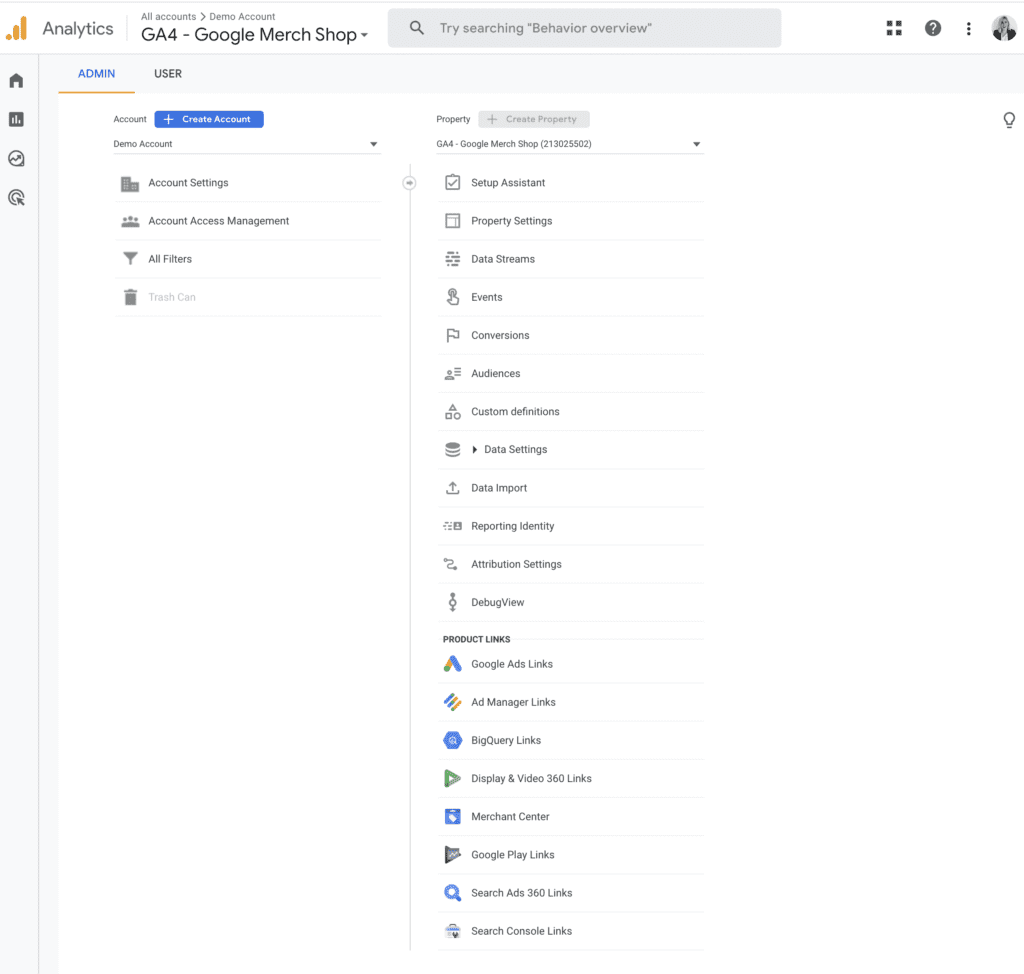
5. Admin
In Google Analytics 4 (GA4), the “Admin” section serves as the control centre for managing and configuring your analytics setup. This section allows you to access and adjust critical settings for your GA4 property, such as data streams, data settings, user management, and more. You can create and manage data streams to track data from different sources like websites, apps, and other digital platforms.
In addition, the “Admin” section enables you to set up data filters, custom dimensions, and custom metrics to tailor your analytics to specific business needs. With user management options, you can grant access to team members and control their level of access to your GA4 property.
Overall, the “Admin” section empowers you to fine-tune your analytics setup and ensure accurate and meaningful data insights for your business.
How to Track Events with Google Analytics 4 (GA4)
Tracking events in Google Analytics 4 (GA4) allows you to measure specific interactions on your website or app, providing valuable insights into user behaviour and engagement.
In Google Analytics 4 (GA4), events are specific interactions that users have with your website or app. These interactions can be tracked to gain insights into user behaviour and engagement. GA4 offers a set of default event types, as well as the flexibility to create custom events.
Here are the four main types of events in GA4:
[GA4] Automatically Collected Events:
In Google Analytics 4 (GA4) automatically collected events are triggered by basic interactions with your website or app.
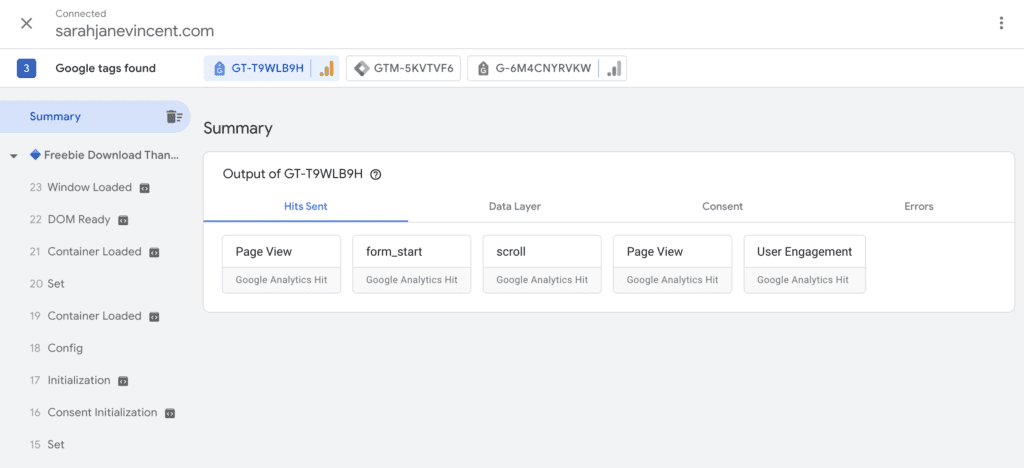
For instance, when using tools like “Tag Assistant” or “Debug Mode,” every time a tag is triggered, it will be recorded as an event. Below, on the left-hand side of the page, in the “Summary” section, you’ll find an example where you can also spot additional automatic events like “form_start” and “link_click.“

[GA4] Enhanced Event Measurement:
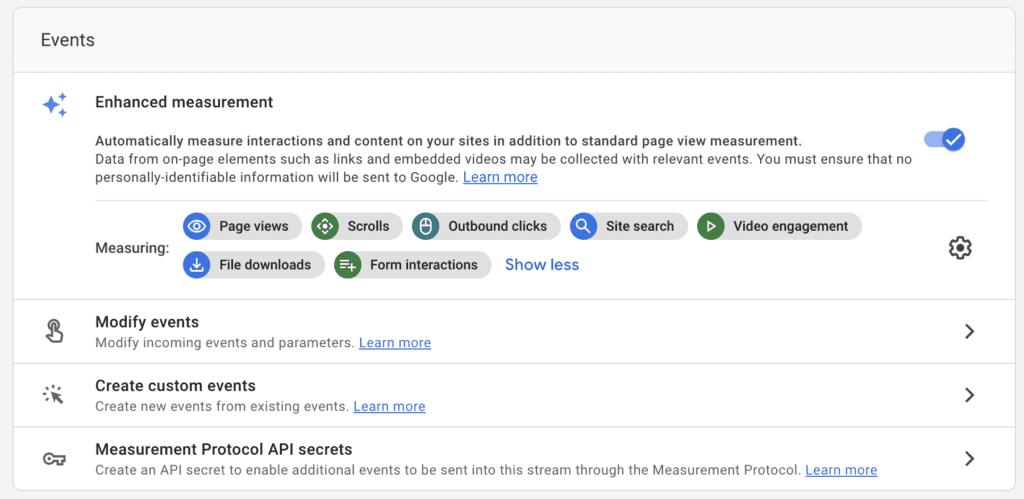
With Enhanced Event Measurement in GA4, you can track user interactions with your content by simply enabling options (events) in the Google Analytics interface. The best part is that there’s no need to make any changes to your website’s code. Once you enable these options for a web data stream, your Google Analytics tag will immediately start sending events.
By default, when you create a data stream in Google Analytics 4, the enhanced measurement feature is enabled. This allows GA4 to automatically track various user interactions on your platform, such as page views, scrolls, outbound clicks, site search, video engagement, file downloads and form interactions. Let’s dive in and explore each of these events:
• Page Views: The Views metric is automatically collected each time a page loads or the browser history changes. This data cannot be turned off and is based on specific browser-history events. It provides insights into the number of views, the page URL (page_location), and the previous page URL (page_refrerrer) dimensions.
• Scrolls: Scroll data is tracked when a user reaches at least 90% of a page for the first time. No additional information is collected for this event.
• Outbound Clicks: Outbound clicks are captured whenever a user clicks a link leading away from the current domain. By default, all outbound clicks are recorded, except for specific cross-domain links. Google Analytics 4 (GA4) gathers details such as link classes, link domain, link ID, link URL, and whether it’s an outbound link.
• Site Search: Site search data is collected when a user performs a search on your site using specific URL query parameters. You can configure additional query parameters for tracking. This event helps you understand what users are searching for and is recorded in the search term dimension.
• Video Engagement: For embedded videos with JS API support enabled, three events are triggered: “video_start” when the video starts playing, “video_progress” when it progresses beyond 10%, 25%, 50%, and 75% of the total duration, and “video_complete” when the video ends. Google Analytics 4 (GA4) collects details such as the video provider, title, URL, and visibility.
• File Downloads: File download events occur when a user clicks a link leading to file downloads, including documents, videos, and more. The parameters include file extension, file name, link classes, link ID, link text, and link URL.
• Form Interactions: Two events track form interactions. “Form Start” records when a user first interacts with a form in a session, and “Form Submit” tracks when a user submits a form. You can compare users who start filling out a form to those who complete it. Parameters include form ID, name, destination URL, and submit button text (if present).
Note: Before activating the Enhanced Measurement feature, take some time to familiarise yourself with each option and understand the additional data that will be collected. If needed, you can also customise the measurement settings and turn off specific options. This way, you have complete control over the data you gather.
To turn enhanced event measurements on, click on “Admin” in your Google Analytics account. In the Property column, click “Data Streams” > “Web”. Under Enhanced measurement, click the blue toggle switch to turn On.
[GA4] Recommended Events:
By adding these predefined event names and parameters, to your website or mobile app, you can gather more useful information about your users and their actions. For example, if you want to track events such as leads and sales you can do this by using recommended and custom events. However, keep in mind that these events won’t be automatically sent; you need to set them up.
As an example, let me show you how to track a newsletter signup event using Google Tag Manager.
Step 1: Sign in to your Google Tag Manager Account. Click on “Tags” > New.
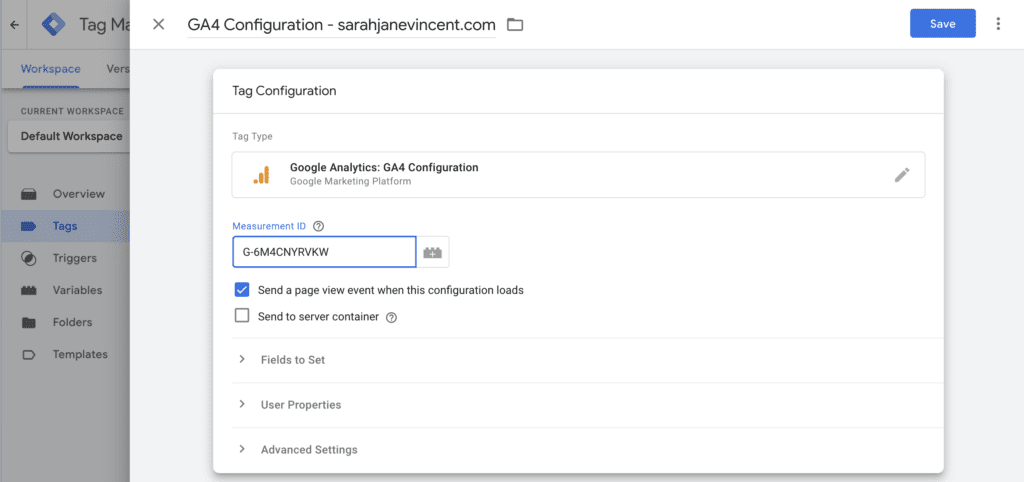
Step 3: Enter a name for the tag at the top (e.g., “GA4 Configuration – yourbizname.com”).
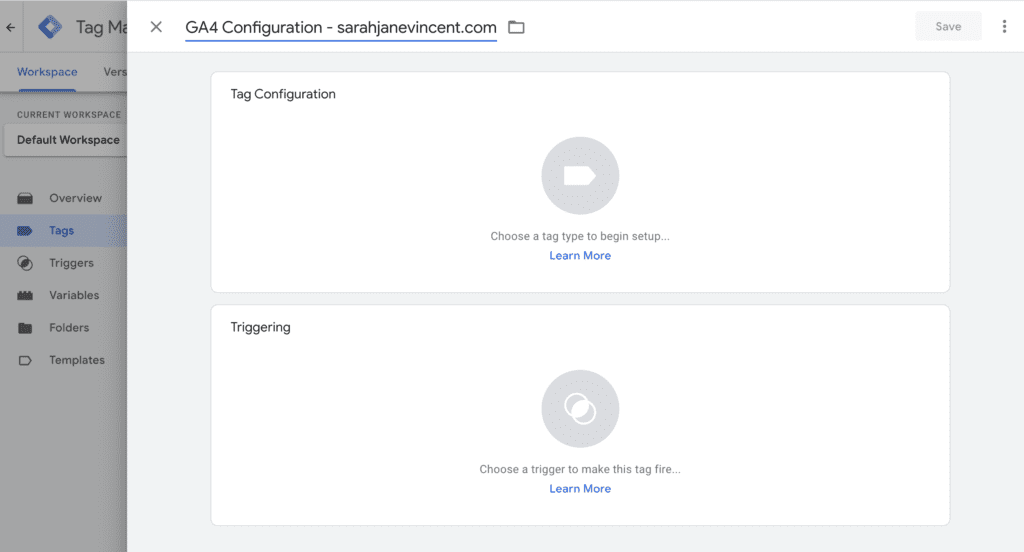
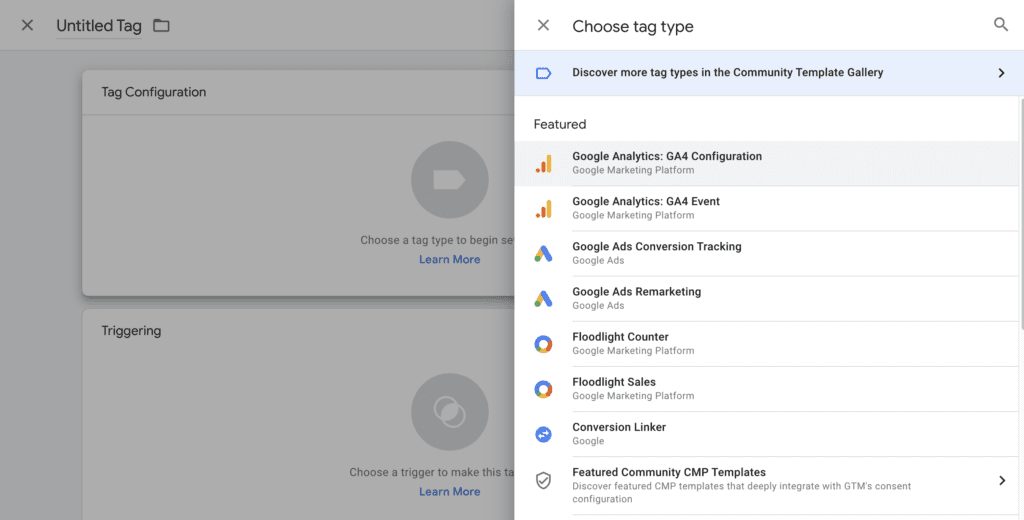
Step 3: Click on “Tag Configuration” and select “Google Analytics: GA4 Configuration”.
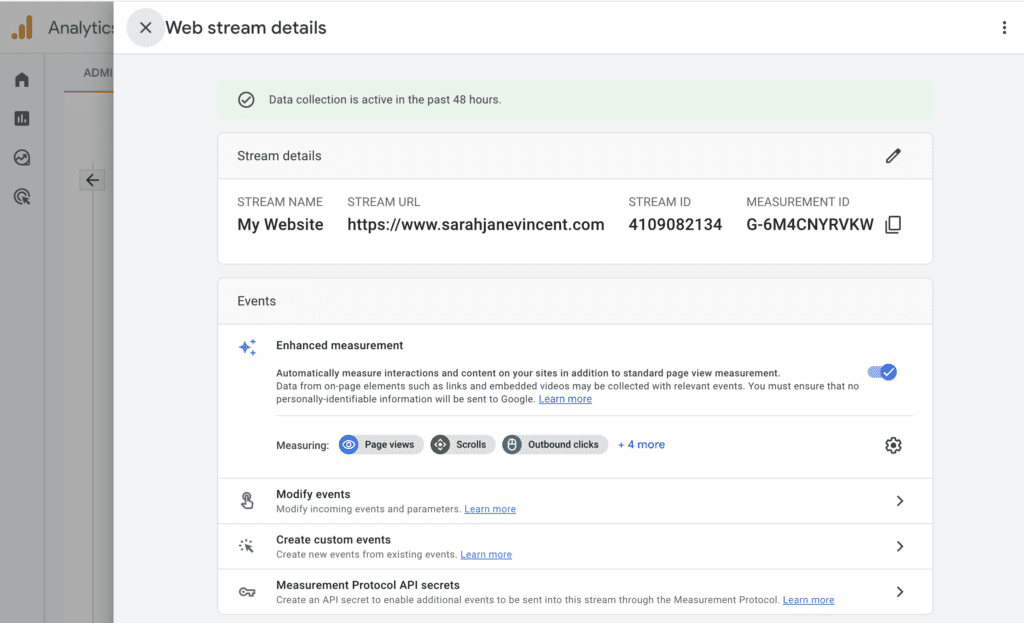
Step 4: Log in to your Google Analytics 4 account, go to “Admin” > “Data Streams” and copy your Measurement ID.
Step 5: Go back into your Google Tag Manager account and paste the Measurement ID. Make sure the “Send a page view event when this configuration loads” is checked.
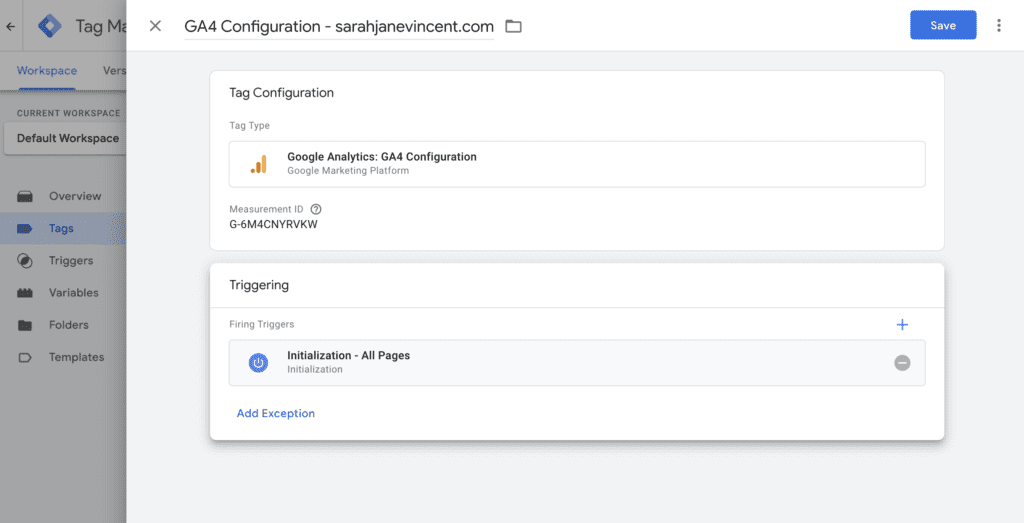
Step 6: After creating the Google Analytics: GA4 Configuration tag, you’ll need to set up a trigger to ensure it loads when someone visits your website. To do this, click on “Triggering” and select the “Initialization – All Pages” trigger.
Step 7: Click “Save.”
Step 8: In Google Tag Manager, click on “Tags” > New.
Step 9: Enter a memorable name for the GA4 Event tag at the top (e.g., “GA4 Event – Signup newsletter”).
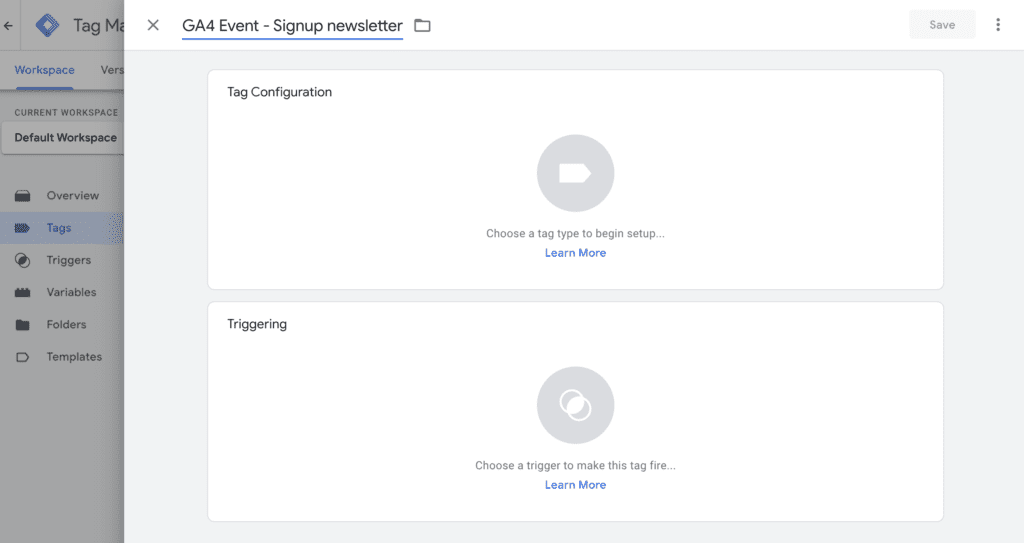
Step 10: Click on “Tag Configuration” and select “Google Analytics: GA4 Event”.
Step 11: Click on the drop-down menu in Configuration and select the Google Analytics 4 Configuration tag you previously created. (e.g., “GA4 Configuration – yourbizname.com or GA4 Configuration – your G-code”)
Step 12: In Event Name, enter a name for the event (e.g., “signup_newsletter”). This will create a new custom event name and it will appear in your Google Analytics (GA4) reports.

Step 13: Next, you will need to create a new trigger to send the event when someone clicks the button. To do this step, click the Triggering Configuration box in your GA4 Event tag. Click on the blue plus symbol in the top right-hand corner. Name your trigger (e.g., “Trigger – Signup newsletter”)
Step 14: Select the trigger type “Click – All Elements”. Then, select the option “Some Clicks” in the trigger fires on section.
Step 15: Select the trigger type “Click – All Elements”. Then, select the option “Some Clicks” in the trigger fires on section.
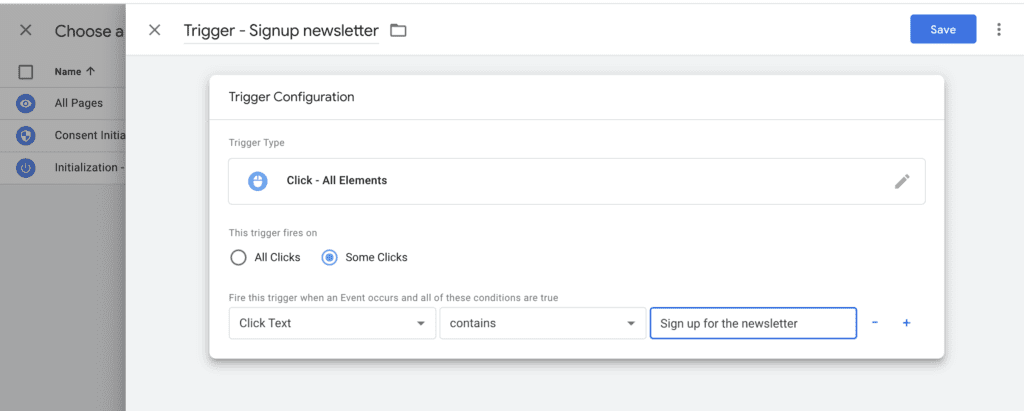
Step 16: Set the following trigger condition: “Click Text contains Sign up for the newsletter”. If you don’t see Click Text, click the first drop down and then select “Choose Built-In Variable”. From the menu, select “Click Text”.
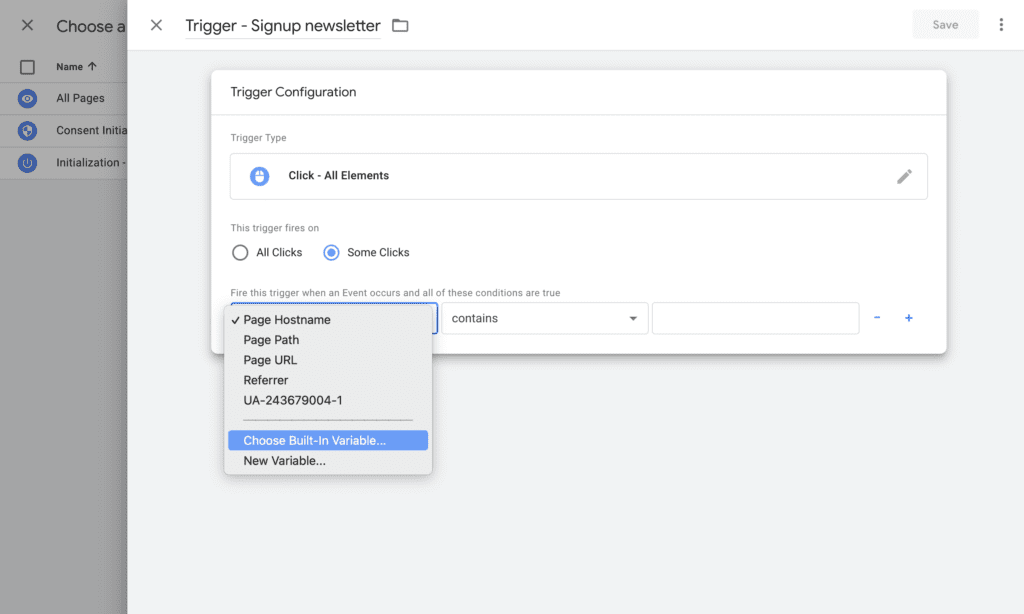
Step 17: Then save all your changes.
Step 18: Before finalising and publishing your new event in Tag Manager, make sure to click on “Preview” to review the data recorded when you interact with the “Sign up for the newsletter” button. This step ensures that the event is capturing the desired information accurately before it goes live on your website.
[GA4] Custom Events:
You can track extra events that are not listed in the recommended events by creating a custom event. This way, you have the freedom to customise event tracking based on your specific needs and collect valuable data beyond the standard options. It gives you more control over what actions you want to measure on your website or app.
In this example, I’m going to show you how to create a custom event in your Google Analytics 4 account.
Step 1: Log in to your Google Analytics 4 (GA4) account, and click on “Admin” located in the lower left-hand corner. Then, navigate to and click on “Events“.
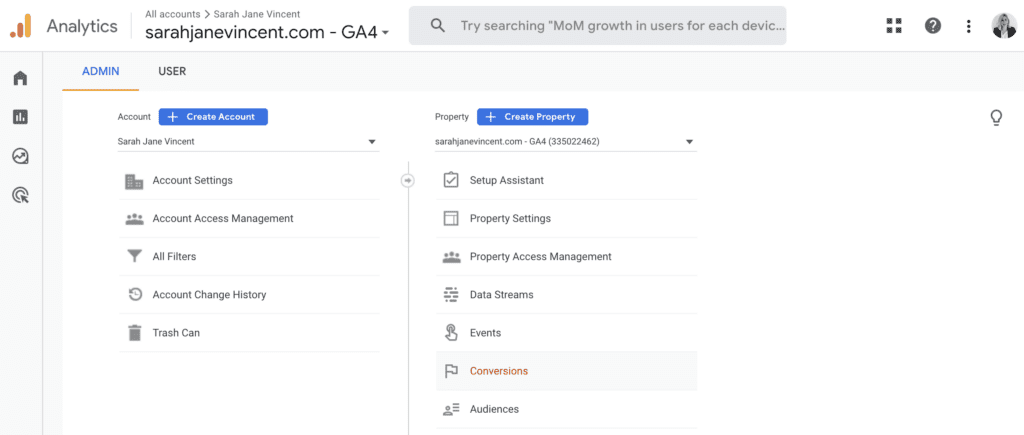
Step 2: Click on “Create Event“

Step 3: In Create Events, click on “Create“. In the Custom event name, click on the box and a drop-down list will appear (e.g., add_payment_info, add_shipping_info, add_to_cart).
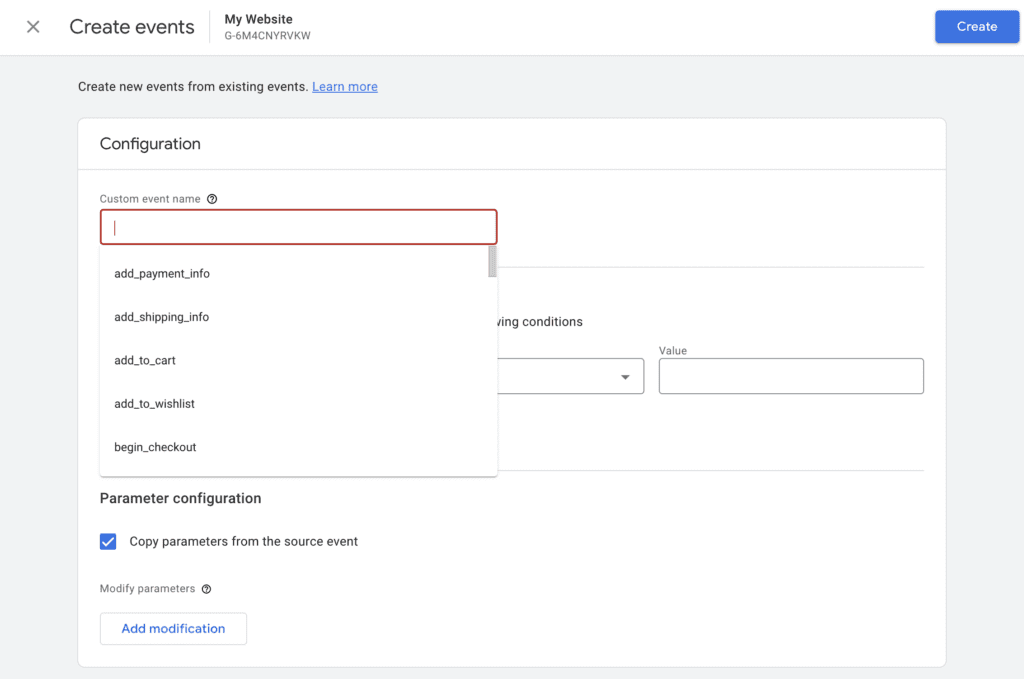
In this example, I will show you how to create a custom event to track when someone completes an enquiry form or submits an email opt-in on your website.
Note: You will need to create a dedicated /thank-you page that automatically redirects users after they complete a form or email-opt-in. This way, you can easily track and measure form submissions and gain valuable insights from Google Analytics.
Here is an example of my own thank-you page that a user gets when they enter their email in exchange for a freebie download on my website.
Pro Tip: Select a user-friendly URL for your trackable page. For example, mine is http://www.sarahjanevincent.com/download-ty/. Be cautious not to use any offensive or inappropriate names since this URL will be visible to users. Following this advice will help you maintain a positive online presence while effectively tracking user interactions.

Step 4: Now that you have your URL for the /thank-you page it’s time to set it all up inside your Google Analytics 4 (GA4) account. Under Custom event name type in “thank_you_page“.

Step 5: In Parameter select “event_name”. Then in Operator choose “equals” from the drop-down menu. Next, in Value type in “page_view”.
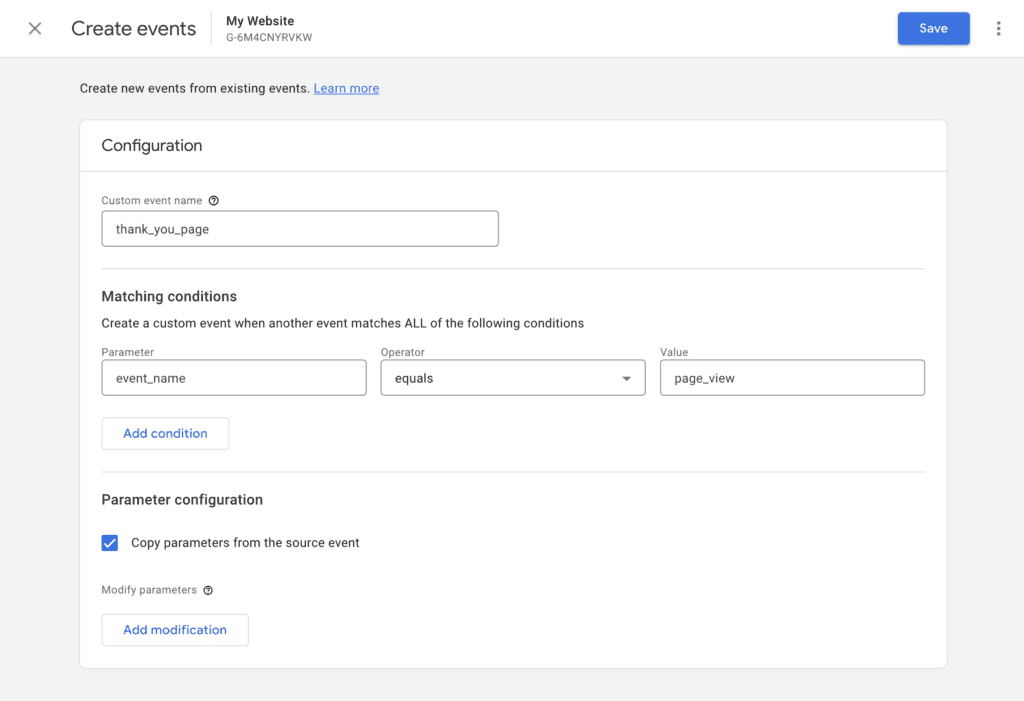
Step 6: Click on “Add condition”. In Parameter, select “event_name” from the drop-down menu. Then in Operator select “contains” from the drop-down menu. Lastly, in Value write the URL name that comes after your website address (e.g. /thank-you or “download-ty”).
Step 7: Make sure to tick the box that says “Copy parameters from the source event.” This ensures that all the relevant parameters from the source event are accurately carried over to the new event you are setting up. This way, you won’t miss any important data and can maintain consistency in tracking your events.
Step 8: Click Save.

Congratulations! You have now successfully set up your own custom event in Google Analytics 4 (GA4).
How to Track Conversions with Google Analytics 4 (GA4)
Tracking conversions with Google Analytics 4 (GA4) is an essential step to measure the success of your business goals and marketing efforts.
Here’s a simple guide to get you started:
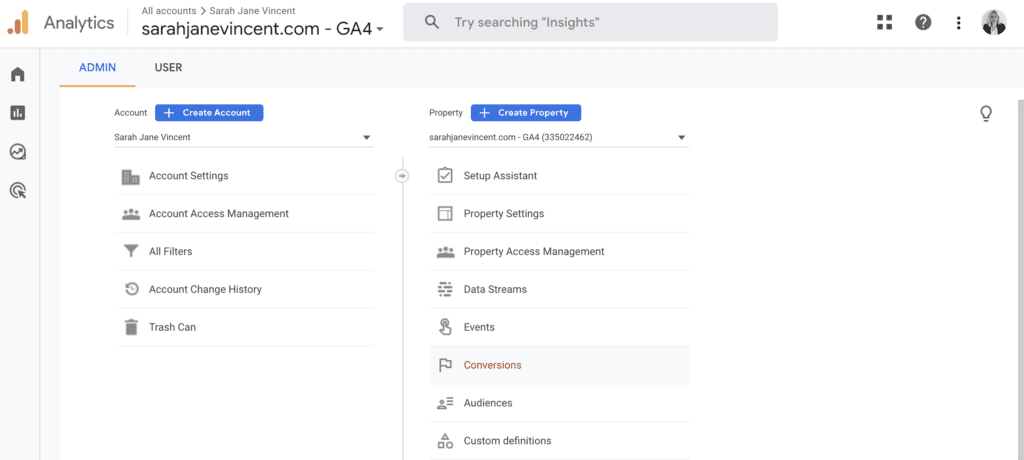
Step 1: Log in to your Google Analytics 4 (GA4) account, and click on “Admin” located in the lower left-hand corner. Then, navigate to and click on “Conversions“.
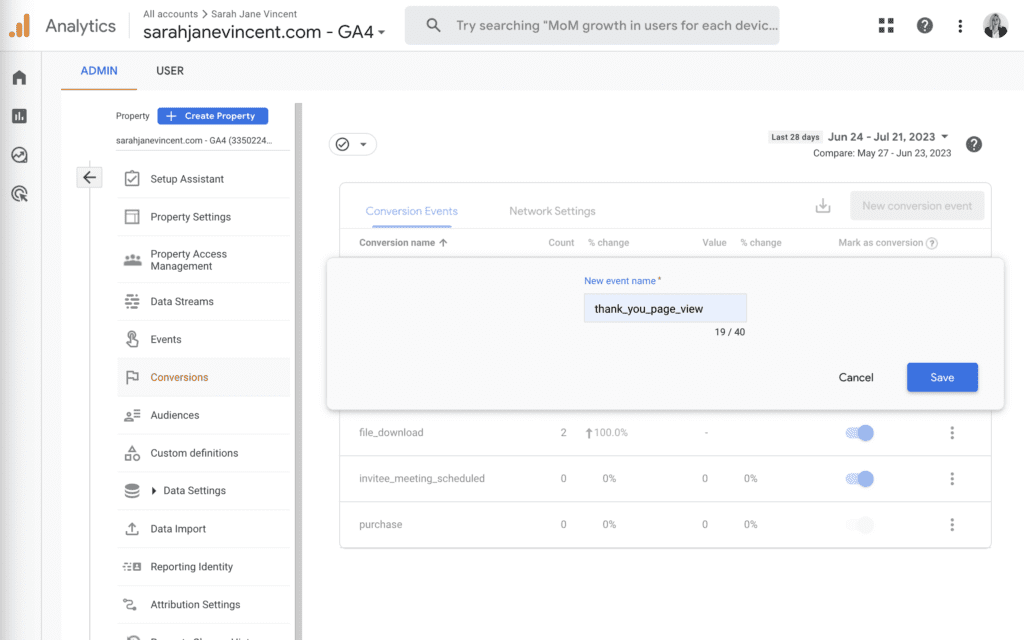
Step 2: Click on “New conversion event” in the top right corner. In the “New event name” box type in “thank_you_page_view“. Then click Save.
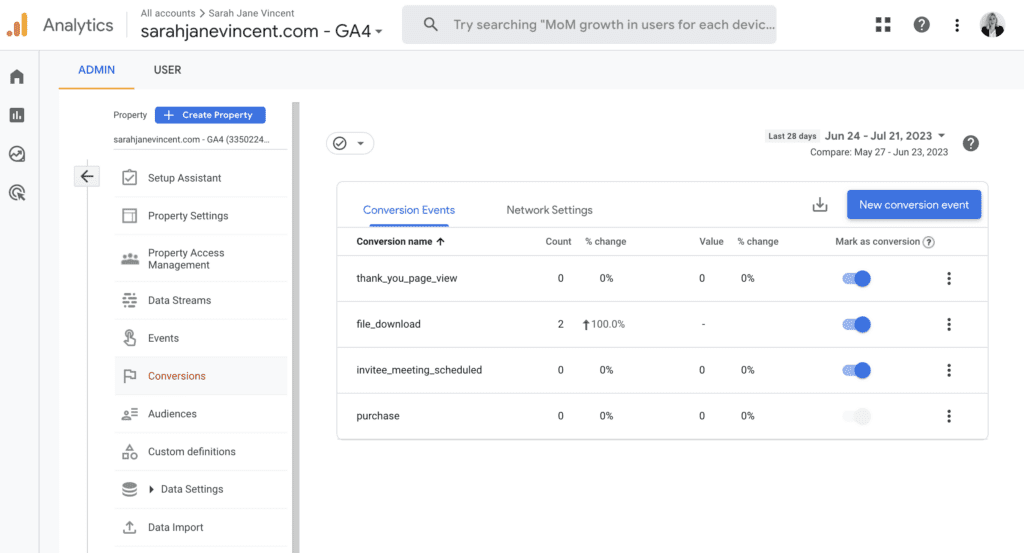
Step 3: Check that you can see your new conversion “thank_you_page_view” in the list of conversion events. Then, slide the blue toggle across to mark this as a conversion.
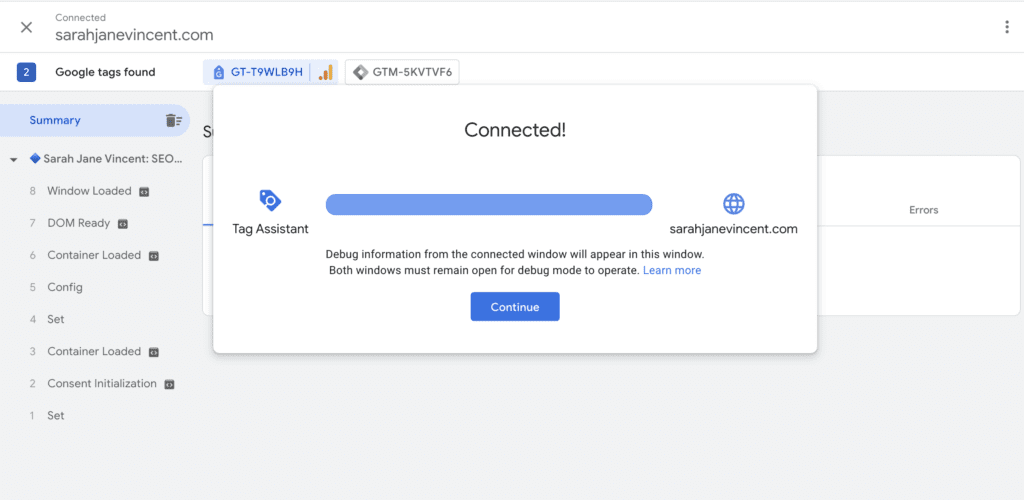
Step 4: The final step is to test that everything is working as it should be. Use “Google Tag Assistant” to activate debug mode. Connect your website. Click “Continue“.
Step 5: Complete an action on your website that redirects to your tracked thank_you_page. For example, I have entered my name and email address for a freebie on my website and have been redirected to the \freebie-ty page URL that is being tracked. You can see in the Summary below that the “Freebie Download Thank You Page” was triggered and an event was tracked.
Understanding Google Analytics 4 (GA4) Reports
In Google Analytics 4 (GA4), you can access various types of reports to gain valuable insights into your website or app’s performance. Here are some of the key types of reports you can find:
1. Overview Reports: These provide a high-level summary of your website or app’s key metrics, such as total users, sessions, and conversion rates. Overview reports offer a quick snapshot of your digital property’s performance.
2. Exploration Reports: Exploration reports allow you to perform ad hoc queries and explore data in greater detail. They offer flexibility in analysing different dimensions and metrics to uncover deeper insights about user behaviour and interactions.
3. User Acquisition Reports: These reports focus on user acquisition and provide valuable information about where your users come from, how they found your site, and what marketing channels drive the most traffic.
4. Engagement Reports: Engagement reports dive into user behaviour on your website or app, revealing metrics like session duration, bounce rate, and pageviews per session. These insights help you understand how users interact with your content.
5. Retention Reports: Retention reports offer insights into user loyalty and help you understand how many users return to your site or app over time. This information is crucial for assessing user engagement and long-term growth.
6. Monetisation Reports: If you have an e-commerce website or app, monetisation reports track revenue, transactions, and other financial metrics to measure your business’s performance and profitability.
7. Events Reports: Events reports focus on specific user interactions, such as clicks, downloads, or video views. You can analyse event data to understand how users engage with particular elements on your site or app.
8. User Behaviour Reports: These reports delve into user behaviour patterns, such as navigation paths, screen flow, and event sequences. Understanding user behaviour can help optimise user experience and increase conversions.
9. Custom Reports: GA4 allows you to create custom reports tailored to your specific business needs. You can customise the dimensions, metrics, and visualisations to gain unique insights relevant to your goals.
Each type of report provides a different perspective on your website or app’s performance, enabling you to make data-driven decisions and improve your digital presence effectively.
How to Create Custom Reports in Google Analytics 4 (GA4)
Creating custom reports in Google Analytics 4 (GA4) allows you to tailor your data analysis to suit your specific business needs. Here are step-by-step instructions on how to create custom reports with Google Analytics 4 (GA4):
Step 1: Access Google Analytics
Go to the Google Analytics website (analytics.google.com) and log in to your account. Navigate to the property you want to work with, which should be set up with GA4.
Step 2: Go to the “Reports” Section
In the left-hand menu, click on “Reports” to access the reporting section.
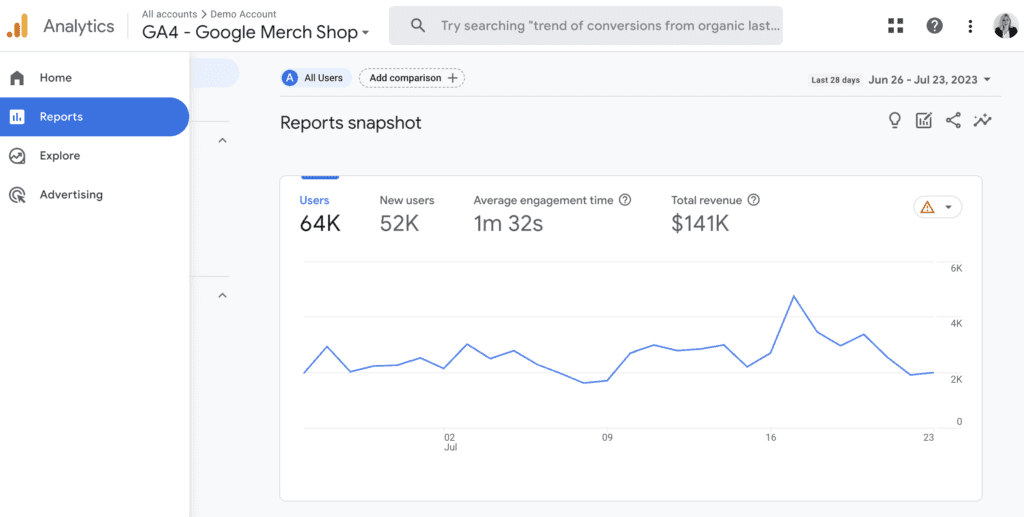
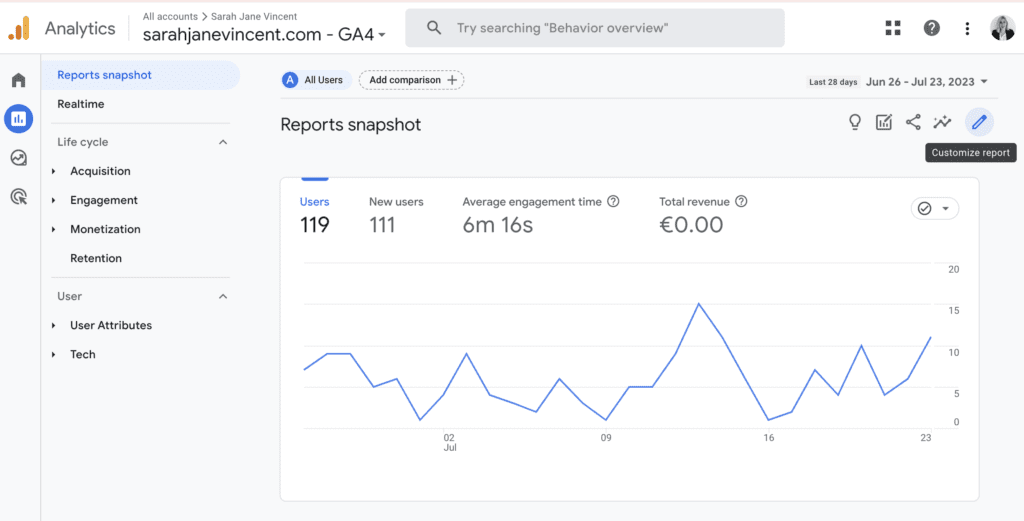
Step 3: Navigate to “Customisation”
Within the “Reports” section, locate the pencil icon and click on “Customise report” in the upper right-hand menu.
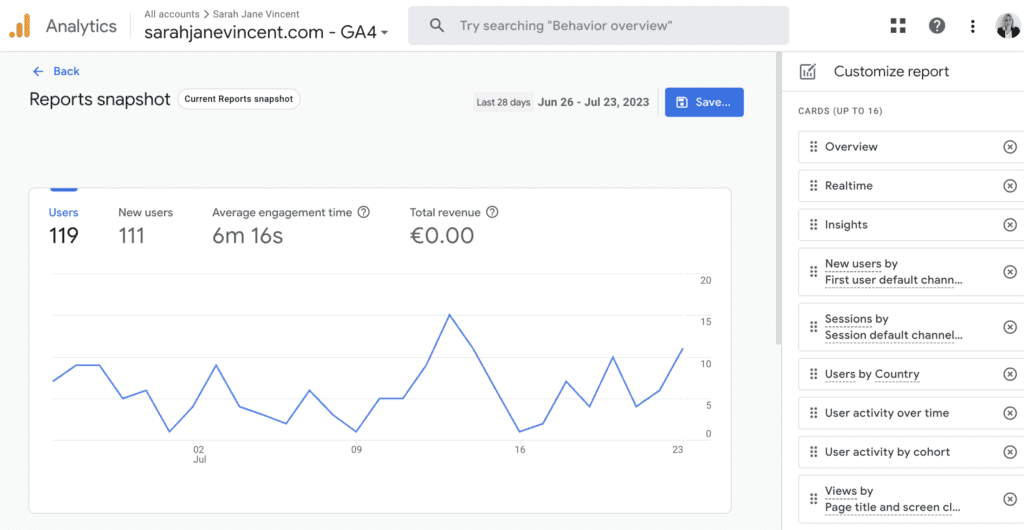
Step 4: Customise Reports”
Add or delete cards from the “Customise report” menu on the right-hand side. Once you are happy with the Reports snapshot layout click Save.
Step 5: Access Your Custom Report
Now you can easily access your custom report anytime from the “Custom Reports” section under “Customisation.”
By following these steps, you’ll be able to create custom reports in GA4, enabling you to gain unique insights and make data-driven decisions tailored to your business needs. Happy customising!
How to Export and Share Reports in Google Analytics 4 (GA4)
Google Analytics 4 doesn’t offer recurring email reports yet. However, you can still export and share your reports manually and set up recurring email alerts for automated insights. Here’s a step-by-step guide to help you set it up:
Step 1: Sign in to Google Analytics
Log in to your Google Analytics account using your credentials.
Step 2: Access GA4 Property
Select the GA4 property you want to create automated reports for from the list of properties in your account.
Step 3: Navigate to Reports
In the left-hand sidebar, click on “Reports” to access the reporting section.
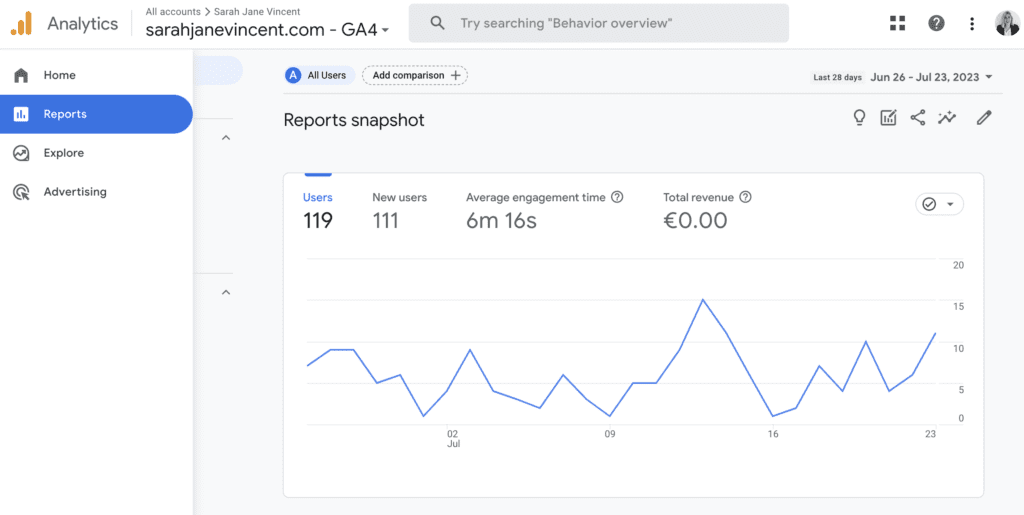
Step 4: Customise Your Report
Select the metrics, dimensions, and other data points you want to include in your automated report. You can choose from various options based on your business needs.
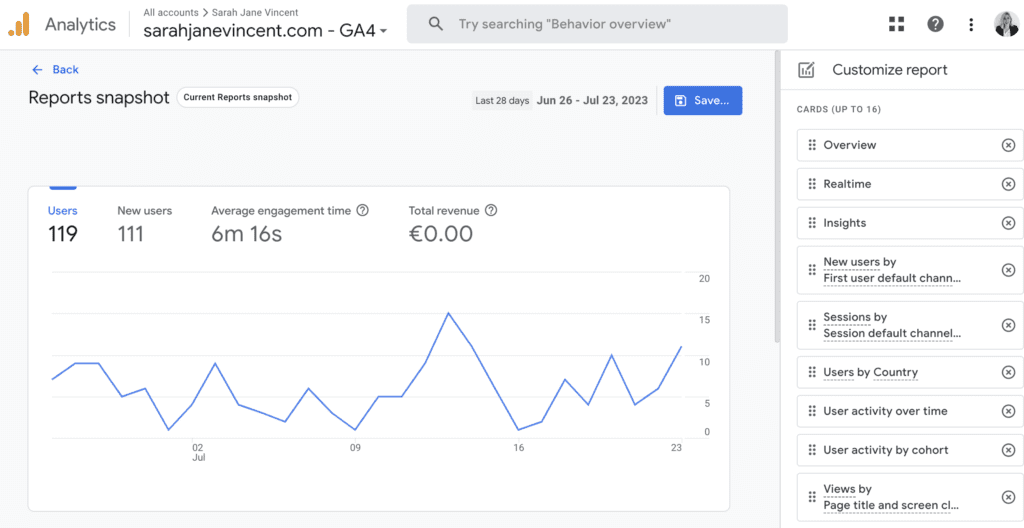
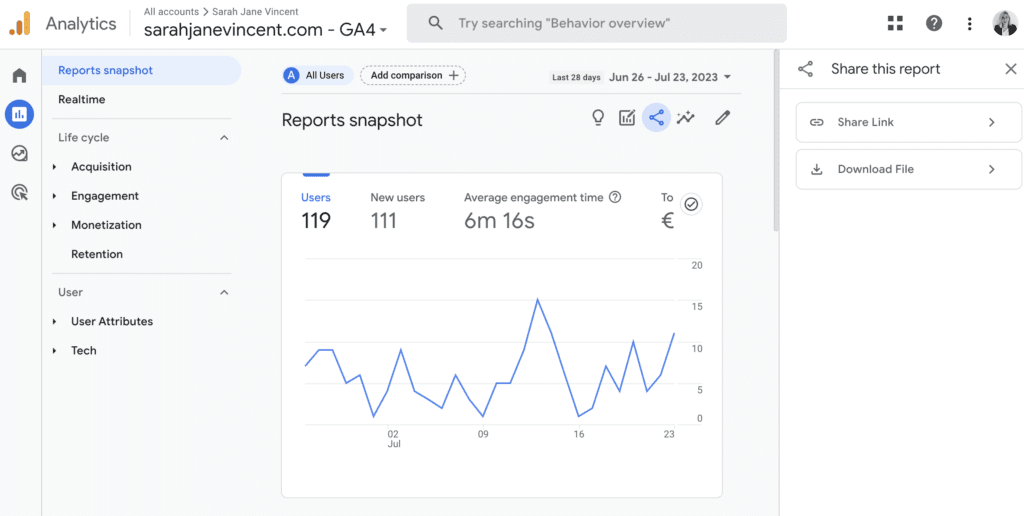
Step 5: Click on “Share this report”
At the top right corner of the report, click on the “Share this report” button.

Step 6: Share Options
You can choose to either create a shareable link or download the report as a PDF or CSV file.
How To Set Up Recurring Automated Insight Alerts in Google Analytics 4 (GA4)
Setting up automated reports in Google Analytics 4 (GA4) can save you time and provide valuable insights regularly. Here’s a step-by-step guide to help you set it up:
Step 1: Sign in to Google Analytics
Log in to your Google Analytics account using your credentials.
Step 2: Access GA4 Property
Select the GA4 property you want to create automated reports for from the list of properties in your account.
Step 3: Navigate to Reports
In the left-hand sidebar, click on “Reports” to access the reporting section.
Step 4: View All Insights
In the Reports Snapshot navigate to the Insights card. Click on “View all insights“.
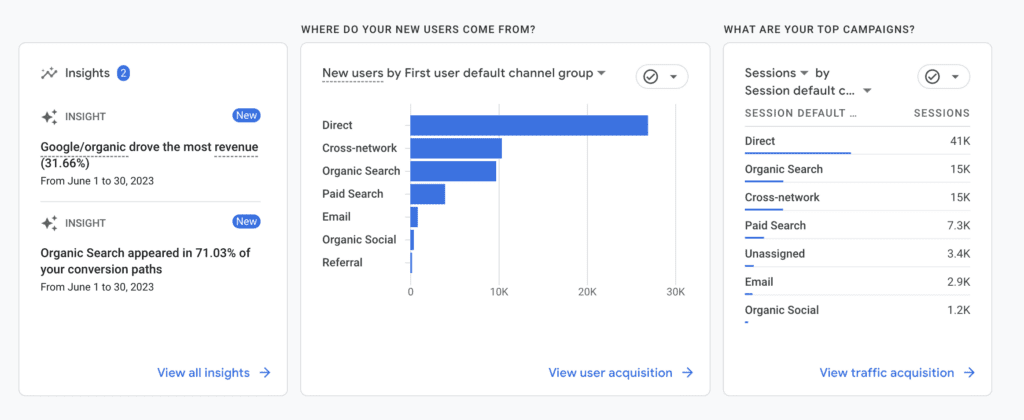
Step 5: Manage Insights
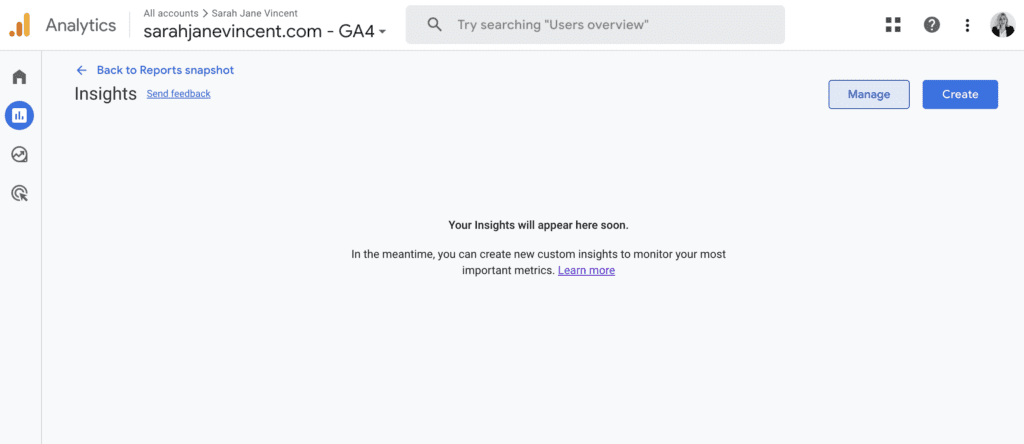
At the time of writing this post, it appears that you have to manually turn on insights. If you see a blank page like the example below click on “Manage” in the upper right-hand corner.
Step 6: Select Insights
In Custom Insights you should now see a list of predefined insights. Slide the toggle bar over to turn on Email Notifications for whichever insights you want to receive.
Note: By default, it will automatically use the email address you created the Google Analytics 4 account with.
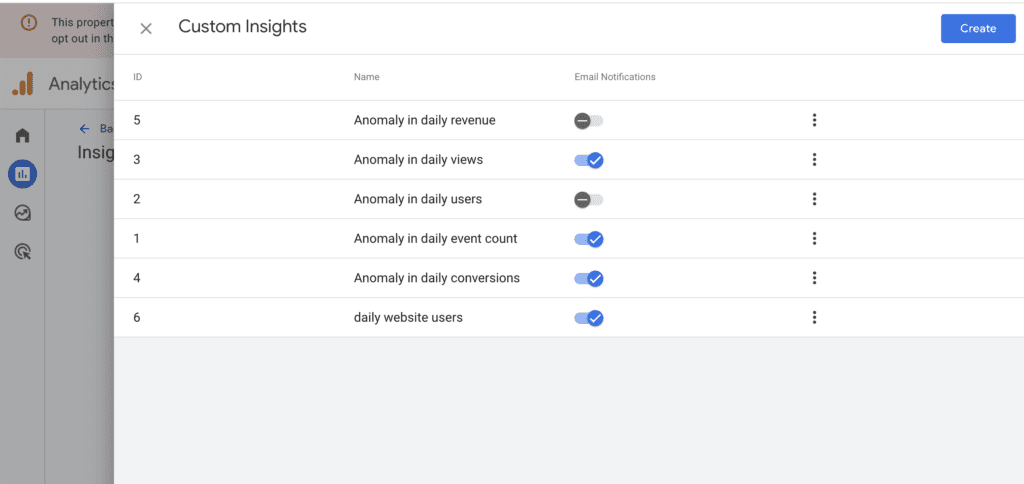
By setting up recurring automated insight alerts, you’ll stay informed about important changes in your website’s data and receive valuable insights to help you make informed decisions for your business.
Summary
Congratulations, you’ve now reached the end of our Google Analytics 4 beginner’s guide! We’ve explored the fundamentals of GA4, learning how to set up properties, navigate the user-friendly dashboard, and track crucial events like page views, scrolls, outbound clicks, video engagement, file downloads, and form interactions. By harnessing the power of enhanced measurement and recommended events, you can delve deeper into your data, gaining valuable insights about your audience’s behaviour and optimising your online strategies.
With GA4, you have a comprehensive tool at your fingertips to measure the success of your website or app. Whether you’re a small business owner or an aspiring digital marketer, the knowledge you’ve gained here empowers you to make informed decisions, optimise performance, and create more personalised experiences for your users.
Happy tracking, and remember, I’m here to help if you have any questions along the way!
Google Analytics 4 Tutorial FAQs
Is Google Analytics 4 (GA4) Different from Universal Analytics (UA)?
Yes, GA4 is a significant update from Universal Analytics. It uses an event-based approach to track user interactions, making it more flexible and comprehensive in gathering data. Additionally, GA4 focuses on user-centric metrics, providing a more holistic view of your audience’s journey.
Why Do I Need Google Analytics 4 (GA4)?
You need Google Analytics 4 (GA4) to gain comprehensive insights into your audience’s behavior, track user interactions across platforms, benefit from enhanced measurement and predictive analytics, ensure privacy and data compliance, and make informed data-driven decisions to optimise your business strategies effectively.
Is Google Analytics 4 (GA4) GDPR Compliant?
Yes, Google Analytics 4 (GA4) is designed to be GDPR compliant. Google has made efforts to ensure that GA4 meets the requirements of the General Data Protection Regulation (GDPR). GA4 offers features that promote data privacy, such as the ability to configure data collection settings, retain data for specific periods, and provide options for user consent management.
However, it’s essential to configure GA4 correctly and review your privacy policy to align with GDPR regulations based on your specific data collection practices. Additionally, it’s advisable to stay updated on any changes or new features in GA4 that may impact GDPR compliance. Consulting legal experts or privacy professionals can further help ensure full compliance with GDPR guidelines.
How to Use Google Analytics 4 (GA4) for SEO?
Using Google Analytics 4 (GA4) for SEO is all about understanding how people discover and interact with your website through search engines. By setting up GA4 and tracking key metrics like organic traffic, top-performing keywords, and user behaviour, you can uncover valuable insights to enhance your SEO strategy. This information helps you optimise your content, attract more potential customers, and ultimately grow your business through improved search engine visibility. GA4’s user-friendly interface and comprehensive reports make it a powerful tool for small business owners and marketers to make data-driven decisions and boost their online presence.
